Workflows (Beta)
Beta Feature
Workflows is currently in beta. Features may evolve and some functionality may be limited as we refine the experience.
Workflows let you automate multi-step research processes by chaining AI agents together into reusable pipelines. Feed in your datasets and campaign data, define what each agent should do, and let the system run — on demand or on a schedule.
Overview
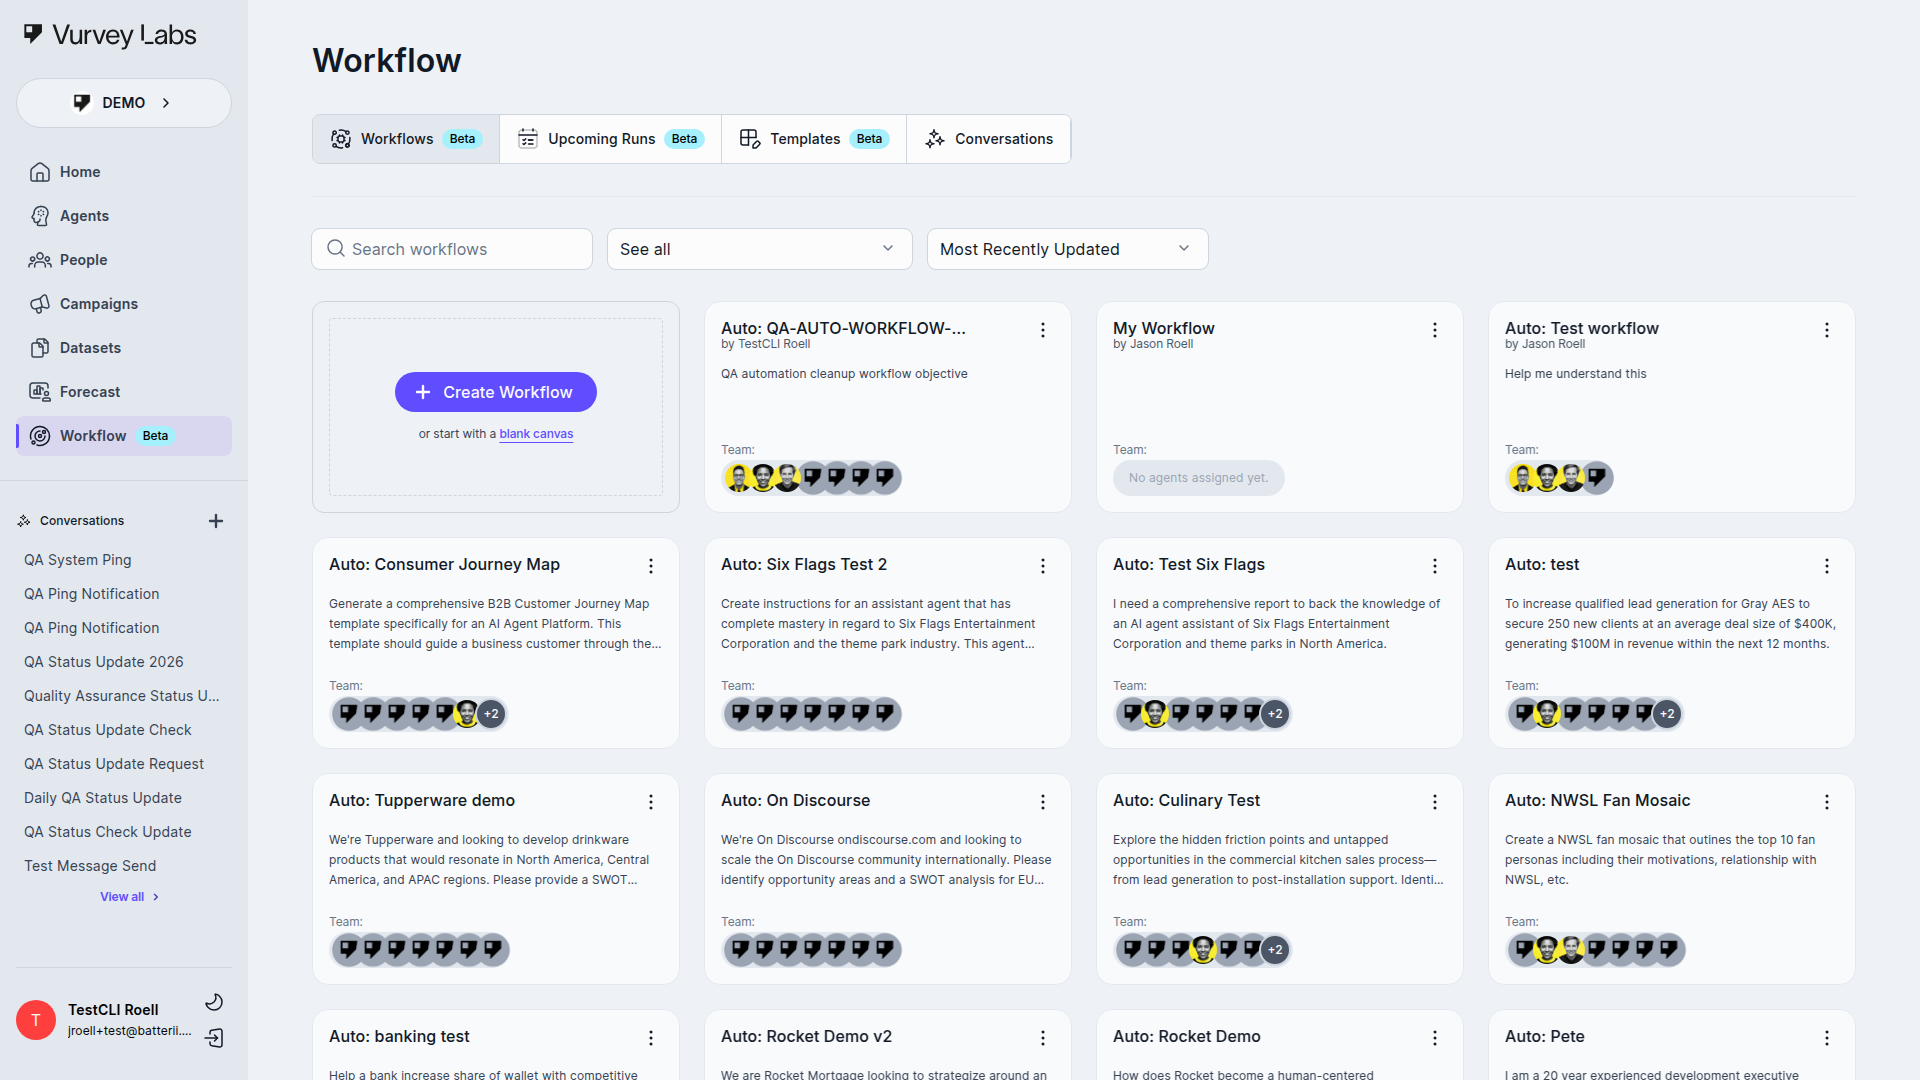
The Workflows page shows all your automation pipelines in a card-based gallery. From here you can create new workflows, run existing ones, and manage schedules.
What Are Workflows?
Think of workflows as automated research teams that work while you sleep. You chain multiple AI agents together, point them at your data, and get comprehensive analysis delivered on your schedule. It's like having a research team that works around the clock.
Navigation
Access Workflows from the main sidebar (look for the beta badge). In current master, the visible tabs are feature-dependent:
| Tab | Description |
|---|---|
| Workflows | Your automation pipelines — the main view |
| Upcoming Runs | Scheduled workflow executions when workflow scheduling is enabled |
| Templates | Pre-built workflow templates when the V3 templates experience is enabled |
| Conversations | Past workflow outputs and conversation history |
The codebase still has an Outputs route, but it is not part of the normal visible tab strip in the current UI.
Browsing Your Workflows
Empty State
When no workflows exist yet, the current UI uses an in-grid create card as the primary call to action. Older docs that describe only a top-right create button are outdated.
Once you've created workflows, they appear as cards in a grid layout. Each card shows:
- Name — the workflow title
- Creator — who built it ("by Jane Smith")
- Description — what the workflow does
- Assigned agents — avatar icons for up to 7 agents, with a "+N more" indicator if there are additional ones
Use the Search bar to find workflows by name, and Sort By to change the display order.
Naming Convention
Use a consistent pattern like "[Project]-[Purpose]-[Version]" — for example, "Q4-Campaign-Analysis-v2." This makes it much easier to find workflows as your library grows.
Workflow Card Actions
Click the three-dot menu (⋯) on any card for quick actions:
| Action | What It Does |
|---|---|
| Share | Control who can access this workflow |
| Copy | Duplicate the workflow so you can modify the copy |
| Edit | Open the workflow builder |
| View | Read-only access (when you don't have edit permission) |
| Delete | Remove the workflow (warns you if it has an active schedule) |
Creating a Workflow
Click Create new workflow to open the workflow-creation modal.
In current master, that modal can include multiple creation paths:
- an initial chooser for automatic, manual, or template-based creation
- a source-selection modal inside the creation flow when you want to attach campaigns, datasets, files, or media up front
- a progress state while AI-assisted workflow generation is running
In automatic mode, the current UI also exposes nested objective helpers:
- Generate Objective
- Select from saved objectives
- Save for future use
Once you are in the manual or automatic path, you'll be asked to fill in:
| Field | Description |
|---|---|
| Name | A title for the workflow |
| Description | What the workflow accomplishes |
| Input Parameters | Variables you can change each time you run it (optional) |
| Instructions | High-level guidance that applies to every agent in the workflow |
| Output Type | The format you want results delivered in |
Reusable Workflows with Parameters
Use input parameters to make a single workflow work for multiple projects. For example, create a parameter so you can run the same analysis workflow on different campaigns without rebuilding it.
The Workflow Builder
The workflow builder is a visual canvas where you design your automation pipeline by dragging and connecting different types of nodes.

Canvas Basics
- Drag and pan to navigate around the canvas.
- Zoom in and out using the controls in the corner (or pinch on a trackpad).
- A mini map in the top-right corner shows the entire workflow at a glance.
- Animated lines between nodes show how data flows through your pipeline.
Node Types
Your workflow is built from several types of nodes that you connect together. The most common ones are:
Variables Node
Define input parameters that can change each time you run the workflow. For example, you might create a variable that defaults to "last 7 days" but can be overridden to "last 30 days" when needed.
Variables are referenced in agent prompts using the syntax (with spaces inside the braces).
Variable Sets
Save different combinations of variable values as named sets. Switch between configurations — like "Weekly Report" vs. "Monthly Report" — without editing the workflow itself.
The current variable-set management flow uses a dedicated Manage Workflow Variables modal. Each saved set has a contextual menu with Set as Active or Deactivate, Edit, and Delete.
Variable Sets: Step-by-Step
Variable sets let you save and reuse different configurations for the same workflow. Here's a complete example:
Step 1: Create Variables in Your Workflow
Suppose you're building a campaign analysis workflow. In the Variables node, create two variables:
| Variable Name | Default Value | Purpose |
|---|---|---|
| last 7 days | Controls the time range the agents analyze |
| all respondents | Filters which audience data gets included |
Step 2: Reference Variables in Agent Prompts
In your agent task prompts, use the variable syntax:
"Analyze all campaign responses from . Focus specifically on the segment. Extract key themes, sentiment trends, and notable quotes."
Step 3: Save Your First Variable Set
- Click the Variable Sets option in the Variables node (or the workflow settings).
- Click Save as Set.
- Name it "Weekly Report" with these values:
report_period= "last 7 days"target_segment= "all respondents"
- Save.
Step 4: Create Additional Sets
Create a second set called "Monthly Executive" with different values:
report_period= "last 30 days"target_segment= "premium buyers"
And a third set called "Quarterly Deep Dive":
report_period= "last 90 days"target_segment= "all respondents"
Step 5: Switch Between Sets When Running
When you click Run, select which variable set to use from the dropdown. The workflow uses those values for the entire run. You can also modify individual values on the fly before starting.
Variable Set Use Cases
- Weekly vs. Monthly reports — same agents, different time ranges
- Segment-specific analysis — same workflow targeting "Gen Z" vs. "Millennials" vs. "all respondents"
- Region-specific runs — analyze North America data one day, Europe the next
- Pre/Post campaign — run the same analysis before and after a campaign launch
Sources Node
Choose what data flows into your workflow:
| Source Type | Description |
|---|---|
| Campaigns | Survey response data from your campaigns |
| Questions | Individual survey questions and their responses |
| Datasets | Your uploaded file collections |
| Files | Specific individual documents |
| Videos | Video content (transcribed automatically) |
| Audio | Audio files (transcribed automatically) |
Click Add Sources to open the source selector and pick from your available data.
Source Strategy
- Use Campaigns for structured survey data with rich response metadata.
- Use Datasets when you need agents to reference uploaded reports and documents.
- Use Individual Files for focused analysis on a specific document.
- Mix source types to give agents the most comprehensive context.
Sources Node: When to Use Each Type
Choosing the right source type makes a big difference in the quality of your workflow output. Here's a detailed guide:
Campaigns
Best for: Structured survey data with response metadata (timestamps, respondent demographics, completion status).
Use when:
- You need to analyze survey responses across multiple respondents
- You want the AI to reference response counts, sentiment distributions, or demographic breakdowns
- Your analysis involves comparing answers across different audience segments
Example prompt: "Analyze all responses from the Holiday Campaign. Compare Gen Z vs. Millennial sentiment on product pricing."
Questions
Best for: Focused analysis on specific survey questions and their responses.
Use when:
- You want deep analysis of one or a few specific questions rather than an entire campaign
- You're comparing how different audiences answered the same question
- You need to extract themes from open-ended responses to a particular question
Example prompt: "Analyze responses to the question 'What would make you switch brands?' and identify the top 5 switching triggers."
Datasets
Best for: Uploaded files, reports, documents, and research archives.
Use when:
- Your analysis draws on background research, industry reports, or competitive intelligence
- You need the AI to cross-reference survey findings with existing documentation
- You're building a workflow that synthesizes information from multiple document sources
Example prompt: "Using the competitive intelligence dataset, identify how our positioning compares to the top 3 competitors."
Files
Best for: Focused analysis of a single important document.
Use when:
- You have one key document (a research report, executive brief, or strategy doc) that needs detailed analysis
- You want agents to deeply understand a single source rather than scanning many files
- The document serves as a reference framework for the rest of the workflow
Example prompt: "Read the attached brand strategy document and evaluate whether our campaign responses align with the stated brand positioning."
Videos
Best for: Video content that gets auto-transcribed for text analysis.
Use when:
- You've collected video survey responses or recorded focus groups
- You need the AI to analyze what people said (via the transcript) rather than visual content
- You're extracting themes, sentiments, or notable quotes from video interviews
Example prompt: "Review the video transcripts and identify the 3 most compelling consumer stories that illustrate unmet needs."
Audio
Best for: Audio files that get auto-transcribed for text analysis.
Use when:
- You have recorded phone interviews, podcasts, or audio diaries
- You need fast thematic analysis across many audio recordings
- The spoken content is more important than any visual component
Example prompt: "Analyze the audio interview transcripts and create a summary of the top pain points mentioned by participants."
Combining Multiple Source Types
The most powerful workflows often combine sources. For example:
- Campaign responses + Dataset = Analyze survey results in the context of industry benchmarks
- Videos + Questions = Compare what people said in video responses to how they answered structured questions
- Files + Campaigns = Use a strategy document as a framework to evaluate campaign performance
Agent Task Nodes
Each agent task node represents one step in your pipeline. An agent receives input from the previous steps, follows your instructions, and passes its output to the next agent.
Each node shows:
- Agent name and avatar — which agent is assigned
- Task prompt — the specific instructions for this step
- Order — where this step falls in the execution sequence
- Tools toggle — enable or disable access to additional AI capabilities
- Model selector — choose a specific AI model (admin only)
Click Add Agent to open the Select Agent modal. The current modal includes search, agent-type filter chips, selection state, and Choose Agent / Add Agent commit buttons depending on context.
Agent Sequencing
Order your agents strategically for the best results:
- First: Data extraction and summarization agents
- Middle: Analysis and synthesis agents
- Last: Report generation and formatting agents
Each agent builds on the output of the ones before it, so logical ordering matters.
Agent Task Node: Configuration Guide
Getting the most out of agent task nodes requires good prompt writing, thoughtful tool selection, and smart model choices.
Writing Effective Task Prompts
Your task prompt is the most important configuration for each agent step. Here are guidelines:
Be specific about the output format you want:
Good: "Create a table with columns for Theme, Frequency (number of mentions), Sentiment (positive/neutral/negative), and a Representative Quote for each theme."
Too vague: "Analyze the themes."
Tell the agent what data to focus on:
Good: "Review only the open-ended responses to questions about pricing. Ignore demographic questions."
Too vague: "Look at the survey data."
Specify how to handle edge cases:
Good: "If fewer than 10 responses mention a theme, group it under 'Other Themes' rather than listing it separately."
Reference previous agents' output when needed:
Good: "Using the theme list generated by the previous agent, create a detailed narrative for each theme with 3-5 supporting quotes."
How Agents Access Previous Output
Each agent in the sequence can see and reference the output of all agents that ran before it. This means:
- Agent 2 can see Agent 1's output
- Agent 3 can see both Agent 1's and Agent 2's output
- The Output Node can see everything
You don't need to explicitly "pass" data between agents. Just reference the previous work naturally in your prompts:
"Building on the competitor analysis from the previous step, identify strategic opportunities where our brand can differentiate."
Enabling/Disabling Tools
The Tools toggle on each agent node controls whether the agent can use additional capabilities beyond basic text generation. When enabled, agents may be able to:
- Search and retrieve content from connected data sources
- Generate charts or visual elements
- Perform web searches (if configured)
- Use specialized analysis capabilities
When to Enable Tools
- Enable for agents that need to search through datasets, retrieve specific documents, or access external information.
- Disable for agents that only need to process and reformat text output from previous agents (like a report-writing agent that synthesizes earlier analysis).
Model Selection
Workspace administrators can choose which AI model powers each agent step. Different models have different strengths:
| Model Type | Best For | Trade-off |
|---|---|---|
| Faster models | Quick summarization, simple extraction, formatting tasks | Lower cost, faster execution, may miss nuance |
| More capable models | Complex analysis, synthesis across sources, creative writing | Higher quality, slower execution, higher cost |
Model Selection Strategy
- Use faster models for early extraction and summarization steps.
- Use more capable models for the synthesis and insight generation steps where quality matters most.
- If unsure, start with the default model and only change if you notice quality issues in specific steps.
Output Node
The final node in your pipeline. After all agents have finished, the output node collects the results. You can generate a formatted report from here.
Output Node: Getting the Most from Your Results
The output node is where your workflow's results come together. Here's how to make the most of it.
Report Generation
After a workflow completes, click on the output node to see the full results. You can:
- View the raw output — see exactly what the final agent produced
- Generate a report — create a formatted document from the workflow output
- Export results — download the output for sharing outside Vurvey
Inside the report editor, the Insert dropdown currently offers:
- Heading 1
- Heading 2
- Heading 3
- Page Break
- Unordered List
- Ordered List
- Image
If you try to leave with unsaved report edits, the UI opens an Unsaved Changes confirmation modal.
Customizing Output Format
To control how your results look, give explicit formatting instructions to your final agent. For example:
"Format the analysis as an executive briefing with these sections: Executive Summary (3 bullet points), Key Findings (numbered list), Supporting Data (table format), and Recommended Actions (prioritized list with effort level)."
Output Format Ideas
- Executive summary — for leadership stakeholders who want the headline
- Detailed report — for research teams who need supporting evidence
- Slide-ready bullet points — for presentations
- Data table — for findings you'll further analyze in a spreadsheet
- Action items list — for teams that need next steps
Exporting Workflow Results
From the Conversations tab, you can:
- Copy the output text to your clipboard for pasting into documents or emails
- Export the conversation as a downloadable file
- Share results by inviting teammates to the conversation
Execution Progress
When you run a workflow, each agent task node shows its current state visually:
| State | What It Means |
|---|---|
| Idle | Waiting for its turn |
| Processing | Currently running (you'll see an animated border) |
| Completed | Finished successfully |
| Error | Something went wrong during execution |
| Cancelled | The workflow was stopped manually |
Running a Workflow
Top Bar Controls
The workflow detail page header gives you the key actions:
| Tab / Button | What It Does |
|---|---|
| Build tab | Edit the workflow structure |
| Run tab | Watch live execution progress (appears during a run) |
| History button | Access past executions via the History drawer (opens sidebar) |
| Edit button | Change workflow name, description, and parameters |
| Save button | Save your changes (appears when there are unsaved edits) |
| Run button | Execute the workflow |
| Cancel button | Opens the Cancel Workflow confirmation dialog for a running workflow |
| Share button | Manage access permissions |
| Schedule button | Set up recurring automatic runs |
On the workflow list page, both Delete Workflow and Duplicate Workflow also use confirmation dialogs before they continue.
Workflow Status
| Status | Meaning |
|---|---|
| Pending | Queued and waiting to start |
| Running | Currently executing |
| Paused | Temporarily paused — can be resumed |
| Completed | All steps finished successfully |
| Failed | An error occurred — check the Run tab for details |
| Cancelled | You stopped it manually |
Error Handling in Workflows
Understanding how errors work helps you build more reliable workflows.
What Happens When a Step Fails
When an agent step encounters an error:
- The workflow stops at the failed step — subsequent agents do not run.
- Previous agents' output is preserved — you don't lose work from steps that completed successfully.
- An error message appears on the failed node in the Run tab.
- The workflow status changes to "Failed" in the card gallery.
How to Debug Failed Steps
- Open the Run tab — click on the failed agent node to see the error details.
- Check the error message — common messages include timeout errors, data access issues, or prompt-related failures.
- Review the agent's input — look at what the previous agent produced. Sometimes the issue is upstream (bad input from an earlier agent).
- Test the agent independently — open a conversation with the same agent and data to see if the prompt works in isolation.
- Check your data sources — make sure all connected datasets and campaigns are still accessible and fully processed.
Common Causes of Workflow Failures
| Cause | Symptoms | Fix |
|---|---|---|
| Data source unavailable | First agent fails immediately | Verify datasets are processed and campaigns are accessible |
| Prompt too complex | Agent times out after 60 minutes | Break into two simpler agent steps or reduce data volume |
| Missing variable values | Agent produces confused output | Check that all |
| Insufficient data | Agent reports "not enough information" | Add more relevant data sources or broaden the scope |
| Permission changes | Workflow fails on run but worked before | Check that you still have access to all connected sources |
Task Timeout Limits
Each agent task in a workflow has a maximum execution time of 60 minutes. If a task exceeds this limit, it will automatically fail with a timeout error. For large-scale analysis, consider breaking complex tasks into smaller steps or reducing the amount of data processed in a single task.
Retry Strategies
- Fix and re-run — after fixing the issue, click Run again. The workflow starts from the beginning.
- Simplify the failed step — if a single agent step is consistently failing, break it into two simpler steps.
- Test incrementally — build and test your workflow one agent at a time, confirming each step works before adding the next.
Scheduling Workflows
Click Schedule to open the scheduling modal and set up recurring runs.
Schedule Options
| Setting | Choices |
|---|---|
| Frequency | Hourly, Daily, or Weekly |
| Time | When to run (hour and minute, 12-hour format) |
| Days | Which days to run (for weekly schedules) |
Email Notifications
Toggle email notifications on and add team members who should receive results. Each recipient gets an email when the workflow completes.
Schedule Preview
Before saving, the dialog shows:
- A human-readable description of the schedule ("Every Monday at 7:00 AM")
- The next scheduled execution time
Scheduling Strategy
- Daily workflows: Run overnight (2–5 AM) so fresh insights are waiting each morning.
- Weekly workflows: Schedule for Monday morning to kick off the week with updated analysis.
- Hourly: Reserve for time-sensitive monitoring during critical campaign launches.
- Always test manually before turning on a schedule.
Performance Tips
Get the best results from your workflows with these optimization strategies.
Optimal Number of Agents
| Agent Count | Performance | Recommendation |
|---|---|---|
| 1–2 agents | Very fast (minutes) | Good for simple extraction or summarization tasks |
| 3–5 agents | Balanced (5–15 minutes) | Ideal for most research workflows |
| 5–7 agents | Moderate (15–30 minutes) | Good for comprehensive multi-step analysis |
| 8+ agents | Slower (30+ minutes) | Consider whether you can consolidate steps |
The Sweet Spot
Most well-designed workflows use 3–5 agents. If you're using more than 7, ask yourself whether some agents could be combined or whether the workflow should be split into two separate pipelines.
Data Volume Considerations
- More data doesn't always mean better results. Agents work best when they can focus on relevant content.
- Filter at the source level — use specific campaigns or labeled subsets rather than pointing agents at everything.
- Large datasets (500+ files) may slow agents down and produce less focused output. If you notice declining quality, narrow your sources.
When to Split vs. Combine
Use ONE workflow when:
- All steps work toward a single deliverable (e.g., a weekly report)
- Each agent builds directly on the previous agent's output
- The entire pipeline runs on the same schedule
Split into MULTIPLE workflows when:
- You have independent analyses that don't depend on each other
- Different parts need different schedules (daily monitoring + weekly synthesis)
- The combined workflow takes too long or consistently fails
- Different team members own different parts of the analysis
Schedule Optimization
- Stagger your scheduled workflows — if you have 5 weekly workflows, don't schedule them all at the same time. Spread them across the morning.
- Match frequency to data freshness — don't run a daily workflow against data that only updates weekly.
- Review run history monthly — retire workflows that aren't being used or whose output nobody reads.
Upcoming Runs
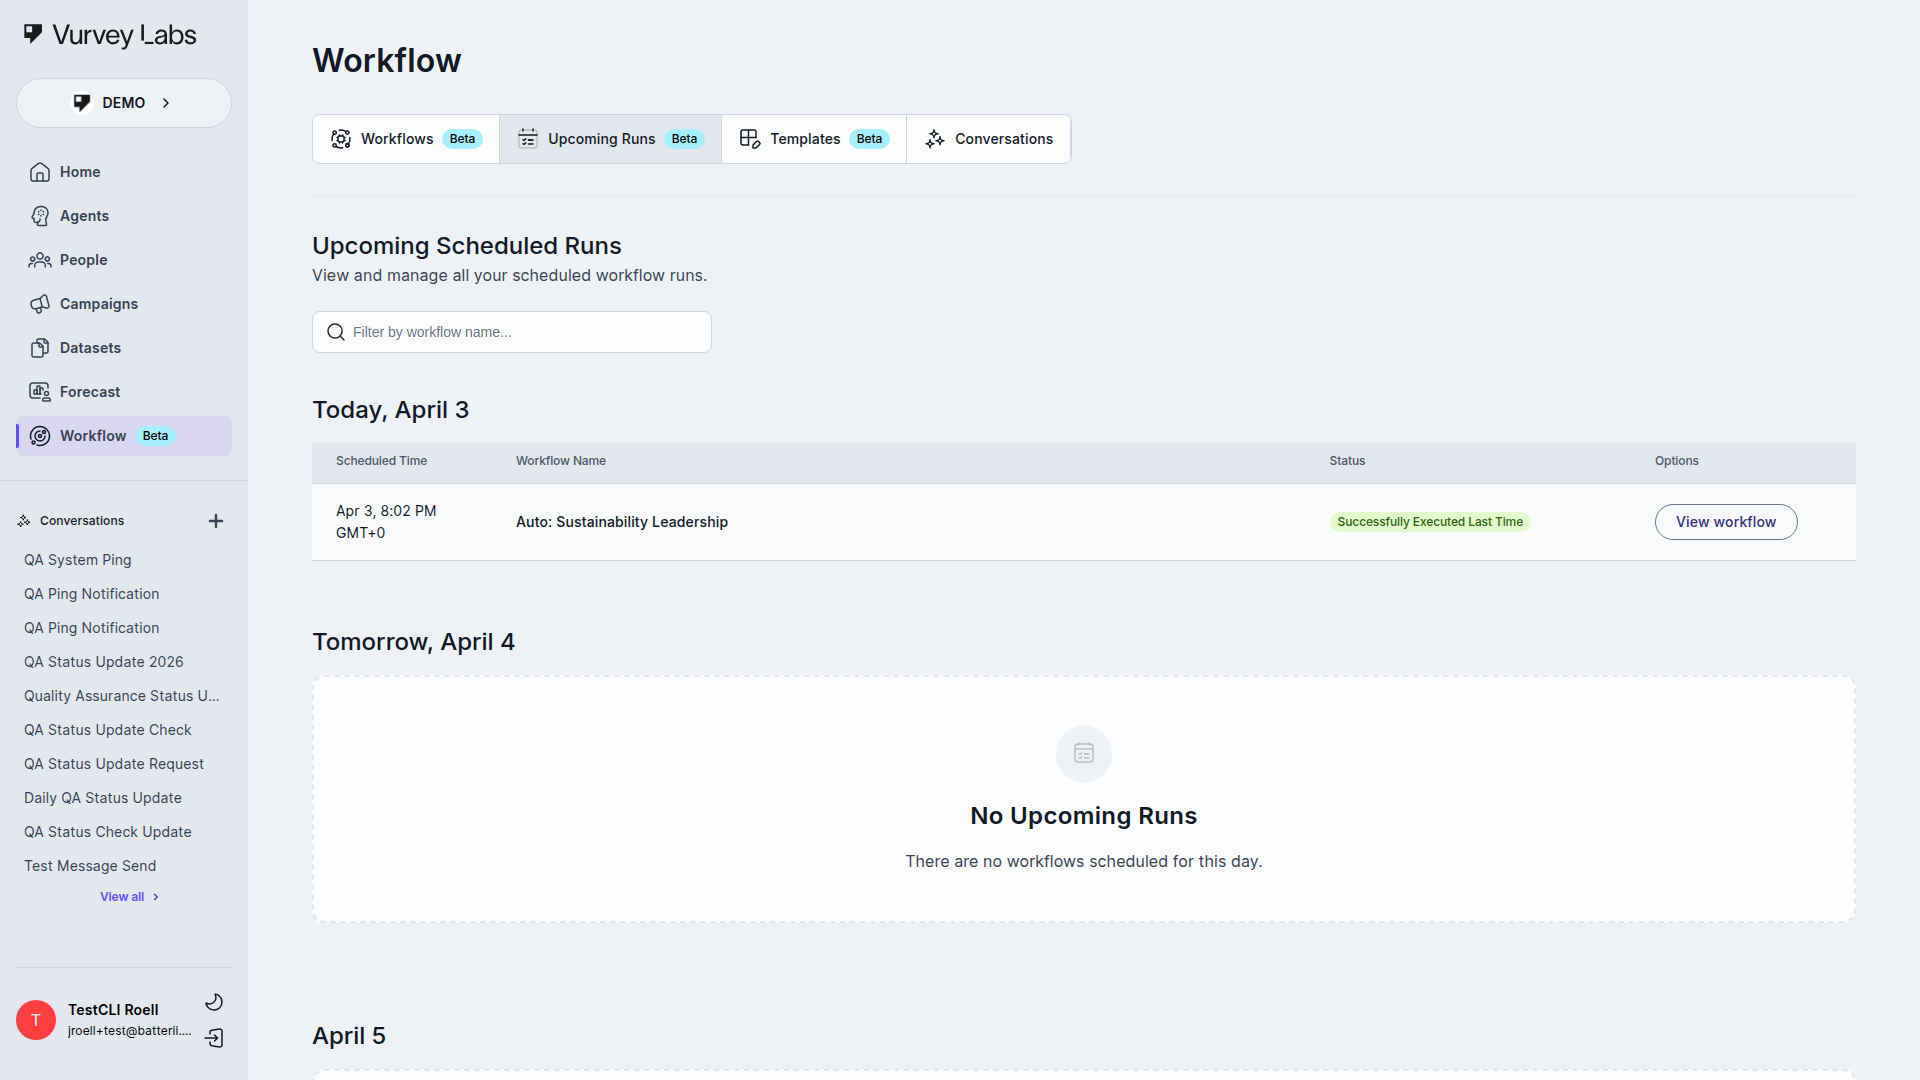
The Upcoming Runs tab shows all scheduled workflow executions, organized by date. Each entry displays the workflow name, scheduled time, and current status.
Empty State
When no workflows have schedules configured, the Upcoming Runs tab displays an empty state message. This is normal and expected — scheduled runs only appear here after you set up a schedule using the Schedule button on a workflow.
Use the Search bar to filter by workflow name. Runs are grouped under date headers like "Today," "Tomorrow," and specific future dates.
Templates
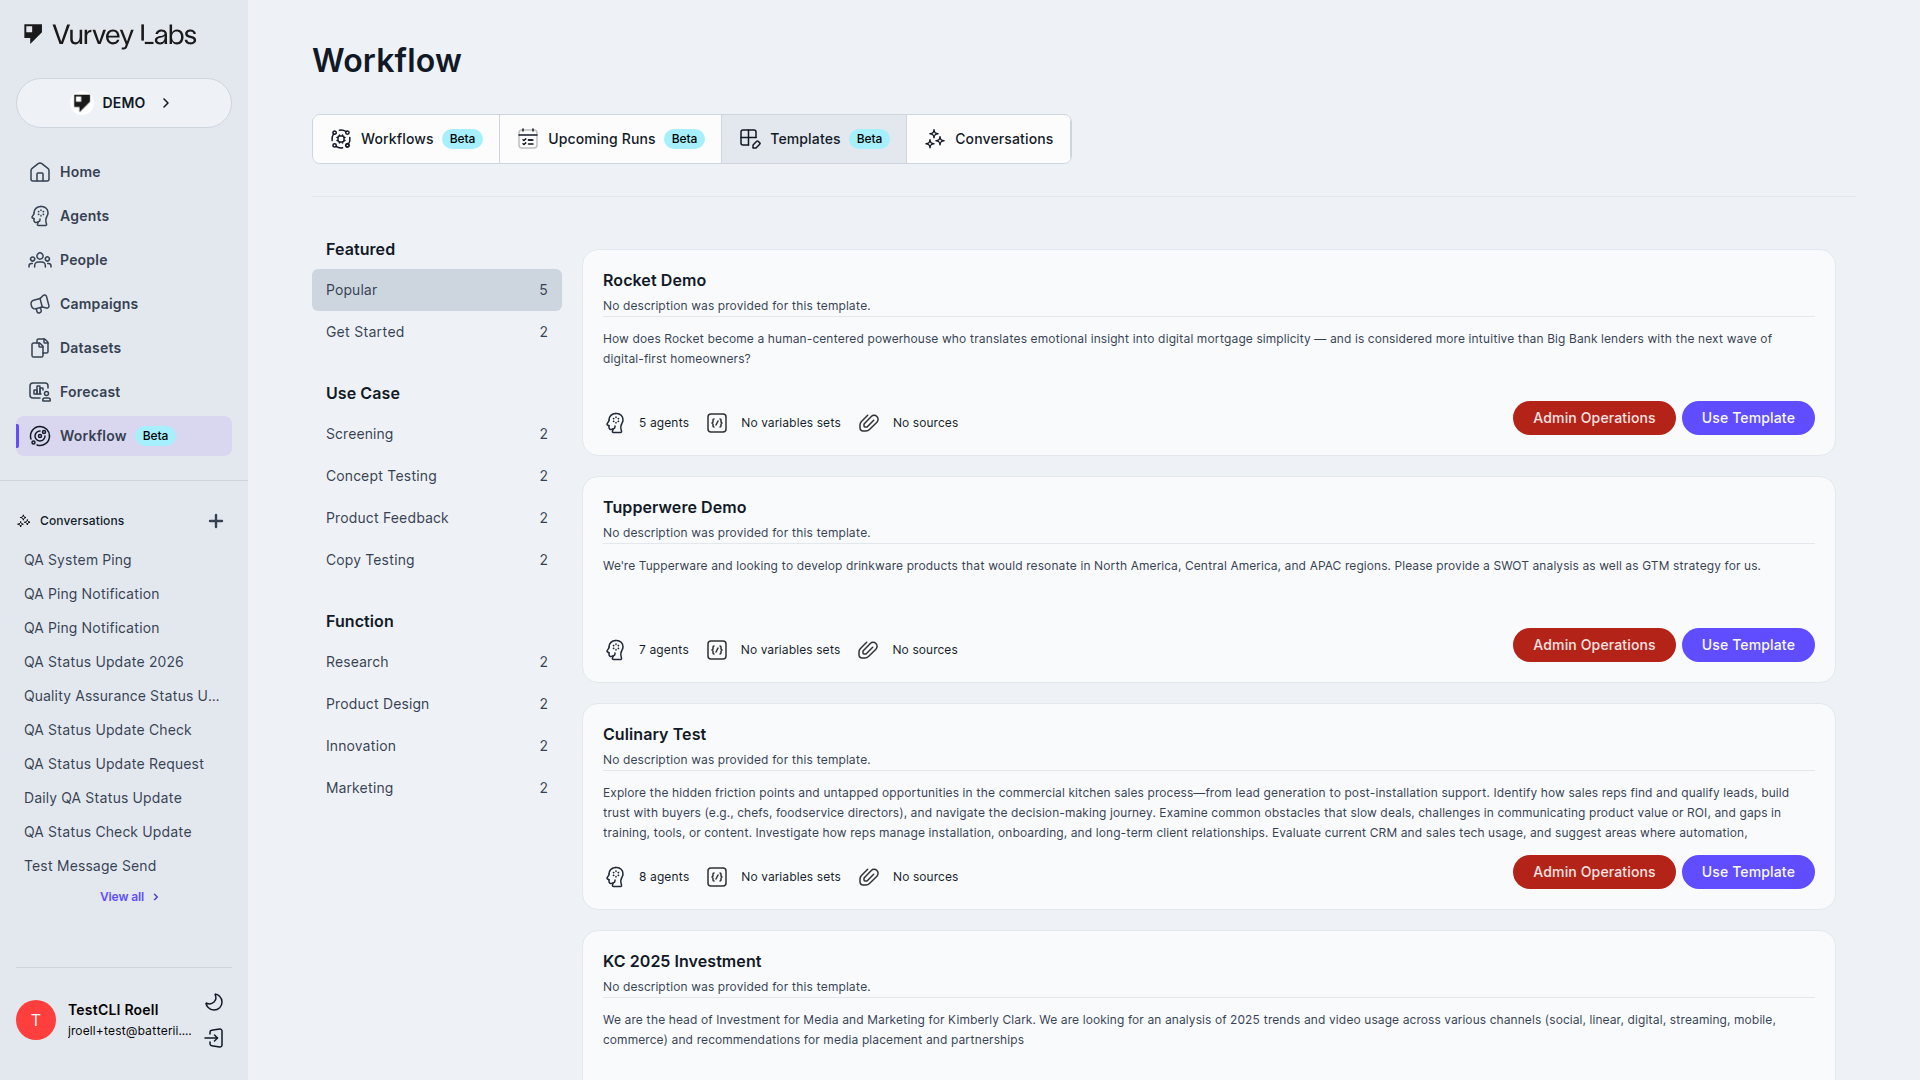
The Templates tab provides pre-built workflow patterns you can use as starting points. Browse available templates, preview what they do, and create a copy to customize for your needs.
The Templates area also uses several dedicated dialogs:
- Create Workflow from Template lets you optionally override the workflow name and objective before creating the copy
- Create Template and Edit Template modals let you manage the template headline, description, and categories
- delete or remove actions from template cards use confirmation dialogs
Conversations
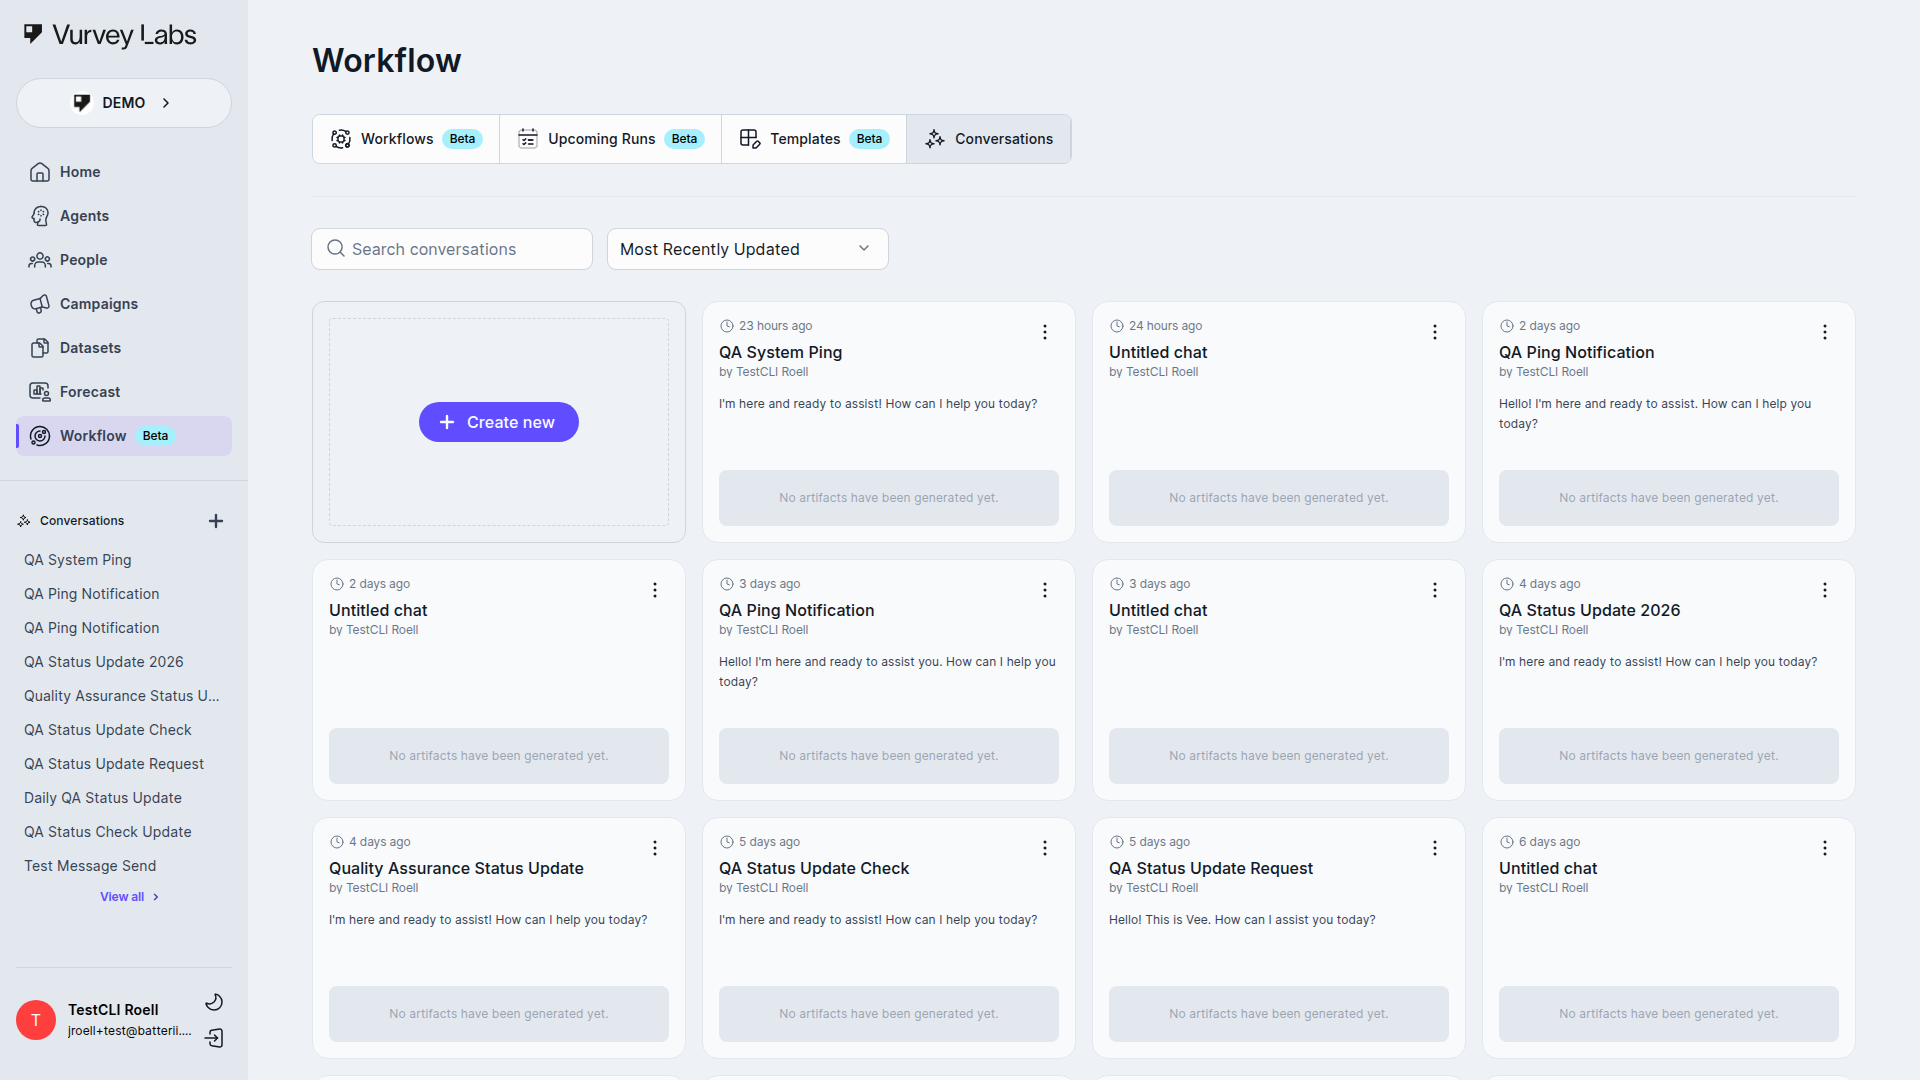
The Conversations tab is your central log of all workflow-generated outputs. Every time a workflow runs, it creates a conversation you can review, export, or share.
Each conversation card shows:
- Date — when the conversation was created ("3 days ago")
- Name — the conversation title
- Creator — who initiated the run
- Content preview — a snippet of the output
- Artifacts — any generated images or media
Conversation Actions
Click the three-dot menu (⋯) on any conversation:
| Action | What It Does |
|---|---|
| Rename | Opens the rename modal |
| Copy | Opens the copy-history modal |
| Export | Opens the export modal |
| Delete | Opens a confirmation dialog, then removes the conversation |
Managing Conversations
- Export important outputs so they don't get buried in the history.
- Rename conversations with the date and purpose for easy searching.
- Delete test runs regularly to keep the list clean.
Report Share and Output Menus
Completed workflow runs expose a few more contextual surfaces inside the report experience:
- the report Share action opens a modal with a share toggle, copyable link, and optional access code
- protected shared links can show an Access code modal before the report loads
- history-entry dropdowns can include Save to Dataset, Export to PDF, Export to Word, and Rerun Report
Sharing and Permissions
The current workflow-sharing dialog uses General Access plus person-level Viewer and Editor roles.
| Role | What It Allows |
|---|---|
| Viewer | See the workflow and its results in read-only mode |
| Editor | Modify the workflow structure and settings |
How to Share
- Click Share from the top bar or the card menu.
- Set workspace-wide access or invite specific people.
- Assign Viewer or Editor roles.
- Save your changes.
Real-World Use Cases
Weekly Campaign Digest
Scenario: Your team runs multiple campaigns and leadership wants a consolidated weekly summary.
How to build it:
- Add all active campaigns as sources.
- Add a data analysis agent with the prompt: "Analyze all campaign responses from the past week. Extract response counts, sentiment trends, and top themes for each campaign."
- Add a report generation agent: "Create an executive summary with key findings, notable quotes, and recommendations for next steps."
- Schedule for Monday at 7 AM.
- Enable email notifications for leadership.
Competitive Intelligence Pipeline
Scenario: You want ongoing analysis of how consumers perceive your competitors.
How to build it:
- Add your competitor intelligence datasets as sources.
- Connect campaigns that mention competitors.
- Add a competitor analysis agent: "Identify all mentions of competitors. Categorize by pricing, features, brand perception, and switching intent."
- Add a trends agent: "Compare this week's competitive mentions to previous weeks. Highlight shifts in perception or emerging threats."
- Schedule weekly for fresh competitive insights.
Automated Video Response Analysis
Scenario: You collect hundreds of video survey responses and need them analyzed systematically.
How to build it:
- Select campaigns with video responses as sources.
- Add an analysis agent: "Review all video transcripts. Summarize key points, emotional tone, and unique perspectives from each respondent."
- Add a theme extraction agent: "Identify the top 5 themes across all video responses. For each, note frequency and sentiment."
- Add a highlights agent: "Select the 3 most compelling video segments that represent the key themes. Note why each is notable."
- Run daily during active data collection, weekly once responses stabilize.
Campaign Launch Monitoring
Scenario: You've launched a high-stakes campaign and need to catch quality issues early.
How to build it:
- Create a workflow targeting the specific campaign.
- Add a quality monitor agent: "Review new responses for survey confusion, technical issues, inappropriate content, or extreme negative sentiment. Flag any concerns."
- Add an alert agent: "If issues are detected, create a brief alert with issue type, affected response count, severity, and recommended action."
- Schedule hourly during launch week, then reduce to daily.
- Enable email notifications for your research team.
Multi-Source Research Synthesis
Scenario: Combine insights from customer feedback, competitive research, and industry reports into unified strategic recommendations.
How to build it:
- Add multiple datasets as sources — customer research, competitor analysis, market reports.
- Add a cross-reference agent: "Find common themes and contradictions across all sources. Note areas of consensus and disagreement."
- Add a synthesis agent: "Create a unified market narrative incorporating customer voice, competitive positioning, and industry trends."
- Add a recommendations agent: "Provide 3–5 strategic recommendations with supporting evidence from the sources."
- Schedule weekly or run it manually to support recurring strategic planning cycles.
Best Practices
Workflow Design
- Start simple — get a two-agent workflow running before adding complexity.
- Test with sample data — run manually with a small dataset before scheduling.
- Monitor the first few runs — watch the Run tab to make sure agents produce what you expect.
- Write clear descriptions — so teammates understand what each workflow does at a glance.
Agent Configuration
- Give each agent a specific, focused task prompt. Vague instructions lead to vague results.
- Order agents logically — extraction first, analysis second, reporting last.
- Enable the Tools toggle when agents need access to additional capabilities.
Scheduling
- Always test a workflow manually before enabling a schedule.
- Start with weekly frequency and increase only if you truly need more frequent updates.
- Set up email notifications so you know when results are ready.
- Review your scheduled runs periodically to retire workflows you no longer need.
Data Sources
- Select only the sources that are relevant — more data doesn't always mean better results.
- Make sure uploaded files are fully processed before running a workflow that references them.
- Test with a smaller subset of data first to validate your agent prompts.
Troubleshooting
Workflow Won't Save
- Check for validation errors — all agent tasks need a prompt.
- Make sure all required fields are filled in.
- Verify you have edit permission.
- Try refreshing the page.
Execution Fails
- Check the Run tab for specific error messages.
- Review individual agent outputs to see where things went wrong.
- Verify your data sources are available and fully processed.
- Simplify agent prompts if they're too complex.
Schedule Not Running
- Confirm the schedule is configured correctly in the Schedule dialog.
- Make sure the workflow has no validation errors.
- Check that there are no unsaved changes.
- Review the Upcoming Runs tab for status information.
Agent Producing Unexpected Output
- Review and clarify the task prompt — be more specific about what you want.
- Check that the agent has access to the right data sources.
- Enable the Tools toggle if the agent needs additional capabilities.
- Try breaking a complex task into two simpler agent steps.
- Test the agent separately in a conversation to debug the prompt.
Workflow Runs but Produces Empty Output
- Check that your data sources actually contain data — an empty campaign or unprocessed dataset produces no output.
- Verify that the time period in your prompt matches when data was collected. If you ask for "last 7 days" but data was collected last month, the agent may find nothing.
- Look at each agent's output in the Run tab. The issue usually becomes clear when you see where content drops off.
- Make sure the workflow was run with the correct variable set — wrong variables can cause agents to look for data that doesn't exist.
Agent Step Takes Too Long
- Check if the agent is processing a very large data source. Consider narrowing the source selection.
- Simplify the agent's prompt — overly complex instructions with many sub-tasks can cause extended processing.
- Break the slow step into two faster steps. For example, split "analyze and create report" into a separate analysis agent and a separate report-writing agent.
- If the agent consistently times out, contact your workspace administrator about timeout settings.
Variable Substitution Not Working
- Check the variable syntax — make sure you're using double curly braces:
(not single braces or other formats). - Verify the variable name in your prompt matches exactly what you defined in the Variables node (including capitalization).
- Make sure the variable has a value assigned — check the variable set you selected when running.
- Look for typos in variable names. A common mistake:
vs..
Scheduled Workflow Missed Its Run Time
- Check the Upcoming Runs tab to confirm the schedule is active.
- Verify the workflow has no unsaved changes — unsaved workflows may not trigger on schedule.
- Make sure the workflow doesn't have validation errors. An invalid workflow won't execute on schedule.
- Check if the workflow was recently edited while a scheduled run was pending — this can sometimes skip a run.
- If the issue persists, delete the schedule and recreate it.
Workflow Produces Inconsistent Results Between Runs
- This is normal to some degree — AI agents may phrase things differently each time, even with the same data and prompt.
- To reduce variability, be more specific in your prompts. Instead of "summarize the key themes," say "list exactly 5 themes, ranked by frequency, with a one-sentence description each."
- Check whether the underlying data changed between runs. New campaign responses or updated dataset files can shift results.
- If consistency is critical, add explicit output formatting instructions to your final agent: column headers, section names, and ordering rules.
Frequently Asked Questions
Click to expand
Q: How many agents can I add to a workflow? There's no hard limit, but 3–7 agents works best. More agents increase processing time.
Q: Can a workflow pull data from multiple campaigns? Yes. Add multiple campaigns as sources and the workflow processes data from all of them.
Q: What happens if a workflow fails in the middle? It stops at the failed step. Check the error in the Run tab, fix the issue, and re-run.
Q: Can I edit a workflow while it's running? No. Wait for it to finish or cancel the run first.
Q: How do I share results with stakeholders? Use the Conversations tab to export or copy outputs. You can also enable email notifications to automatically send results.
Q: Do scheduled workflows run when I'm logged out? Yes. Scheduled workflows run on the server regardless of whether you're logged in.
Q: Can agents in a workflow see previous agents' output? Yes. Each agent can reference outputs from the agents that ran before it.
Q: Can I run the same workflow with different settings? Yes. Use input parameters and save different variable sets for different configurations.
Q: Can I duplicate an existing workflow? Yes. Click Copy from the workflow card menu.
Q: How do I know which agent is currently running? The Run tab shows real-time progress with visual indicators on each agent step.
Q: Can I chain workflows together? Not directly within the platform. However, you can design workflows that build on each other's outputs. For example, run Workflow A (data extraction), export the results, upload them as a dataset, and use that dataset as a source in Workflow B (analysis). Scheduled workflows can be timed sequentially to approximate chaining — schedule Workflow A for 2 AM and Workflow B for 4 AM.
Q: How do I version control my workflows? Use the Copy feature to create snapshots. Before making significant changes, duplicate the workflow and rename the copy with a version number (e.g., "Campaign-Analysis-v3"). This gives you a rollback point if the changes don't work out. Keep the old version until you're confident the new one works correctly.
Q: What's the maximum number of agents in a workflow? There is no strict technical limit, but performance degrades noticeably above 10 agents. We recommend 3–7 agents for most workflows. If you find yourself needing more than 7, consider splitting into multiple workflows.
Q: Can workflow agents access web search? This depends on your workspace configuration and the specific agent setup. Some agents can be configured with web search tools. Check with your workspace administrator if this capability is available. When web search is enabled, make sure to note this in the agent prompt so the AI knows it can look things up.
Q: How do I share workflow results with non-Vurvey users? You have several options: (1) Use the Export feature in Conversations to download results as a file you can email or share. (2) Copy the output text and paste it into a document, presentation, or email. (3) Enable email notifications on the schedule — recipients receive the output directly in their inbox, though they need to be workspace members. For external stakeholders, export and share manually.
Q: Can I pause a scheduled workflow temporarily? Delete the schedule and recreate it later when you're ready to resume. There's no pause/resume toggle currently. Before deleting, note down the schedule settings so you can recreate them easily.
Q: Do workflows count toward any usage limits? Workflow runs consume AI processing resources. Check your workspace plan for any limits on the number of workflow runs per month. Hourly schedules use significantly more resources than weekly ones.