Campaigns
Campaigns are video-powered consumer research studies that capture authentic feedback through structured questions and open-ended video responses. Launch a survey, hear directly from your audience, and let AI surface the insights that matter.
Overview
The Campaigns section is your research command center. From here you can create new studies, manage active campaigns, browse templates, track usage, and create AI-powered highlight reels from video responses.
More Than Traditional Surveys
Campaigns go beyond standard surveys by capturing the emotions, expressions, and authentic voices of your respondents on video. Combine structured questions (ratings, rankings, multiple choice) with open-ended video responses for richer insights that quantitative data alone can't provide.
Navigation Tabs
The Campaigns page has four tabs:
| Tab | Description |
|---|---|
| All Campaigns | Dashboard view of all your campaigns |
| Templates | Browse categorized campaign templates to get started quickly |
| Usage | View workspace analytics and credit consumption |
| Magic Reels | AI-generated video highlight reels from campaign responses |
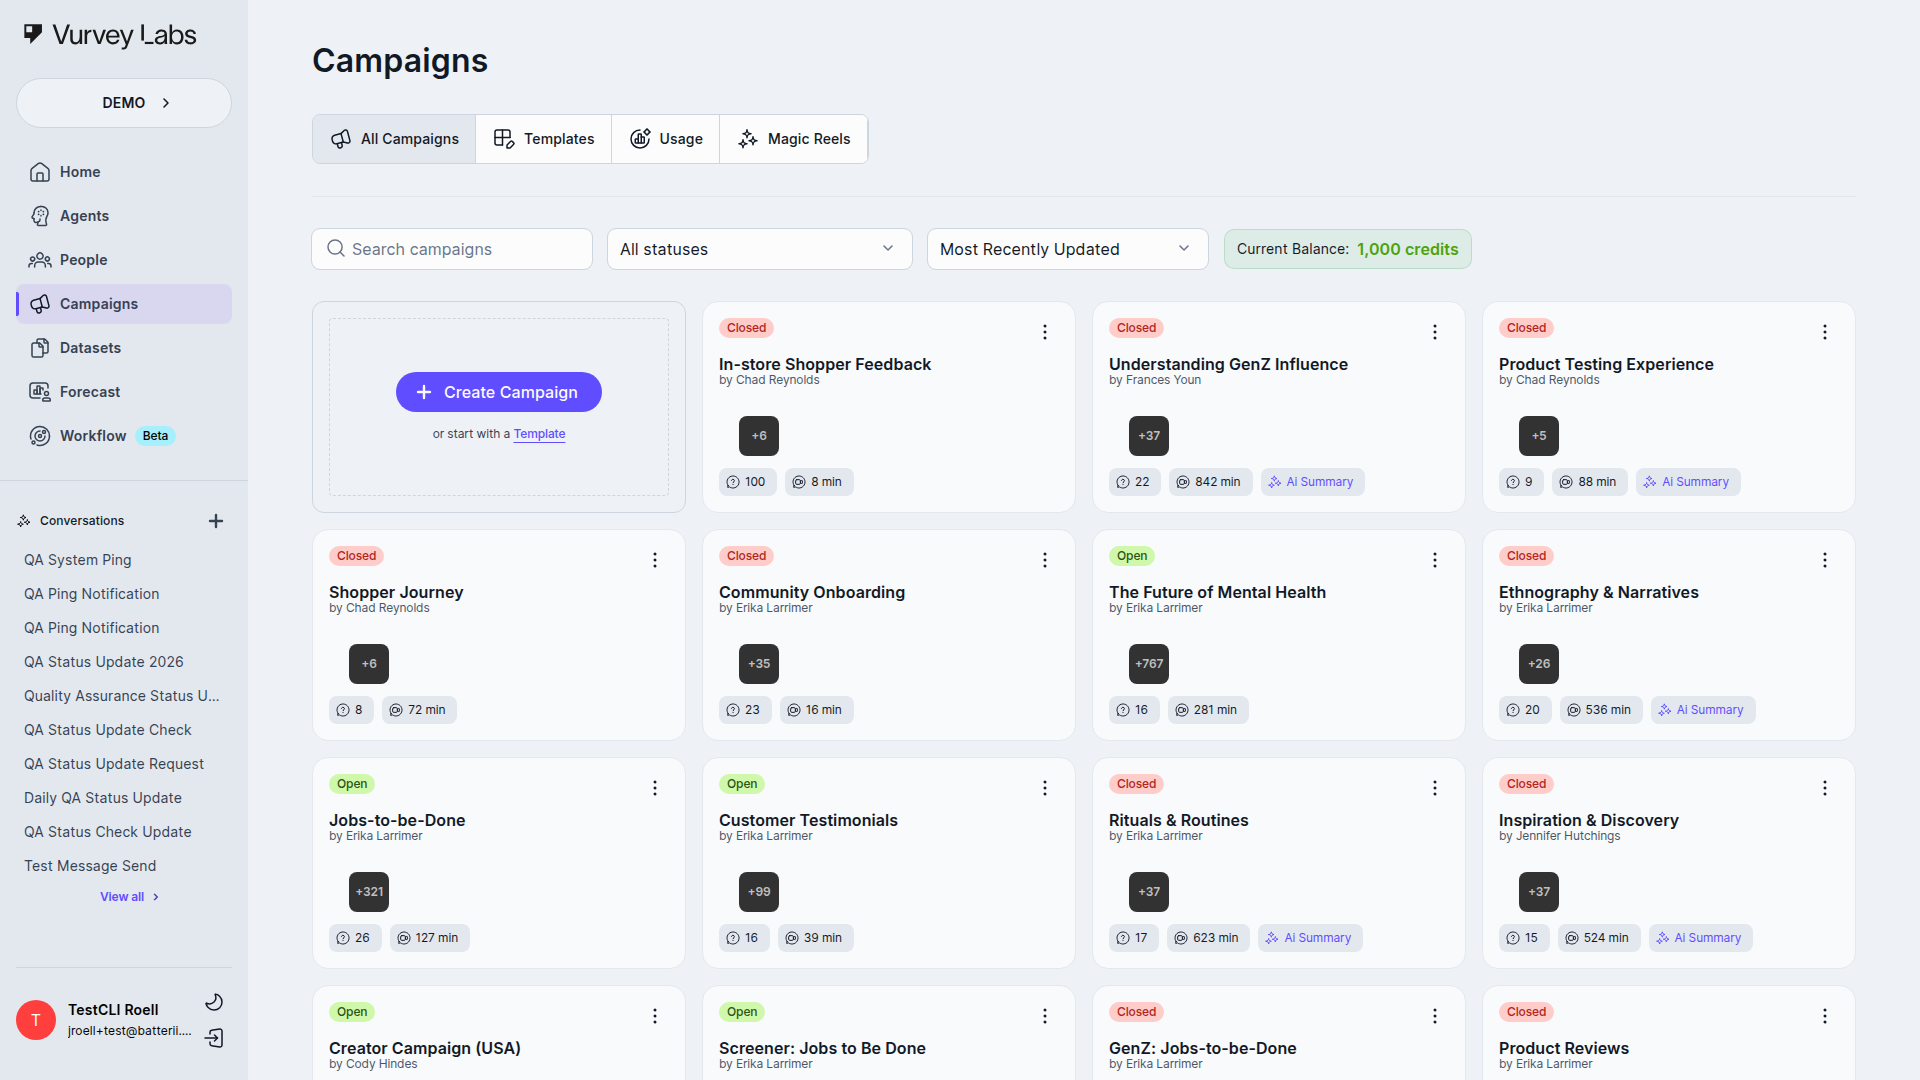
All Campaigns
The default view displays your campaigns in a card grid layout. Each card shows the campaign name, creator, video preview thumbnails from responses, and key metadata.
Status Badges
A colored badge on each card indicates where the campaign is in its lifecycle:
| Status | Color | What It Means |
|---|---|---|
| Draft | Cyan | Still being built — not yet collecting responses |
| Open | Lime Green | Live and actively collecting responses |
| Closed | Red | Collection complete, ready for analysis |
| Blocked | Teal | Temporarily paused |
| Archived | Teal | Inactive but preserved for reference |
Status Best Practices
- Keep campaigns in Draft until you've tested them with Preview mode
- Close campaigns once you've met your response goals
- Archive rather than delete to preserve your data
- Use Blocked sparingly — only for urgent issues like inappropriate responses
Campaign Card Details
Each card displays metadata chips at the bottom:
| Chip | What It Shows |
|---|---|
| Questions | Number of questions in the campaign |
| Duration | Total video minutes collected |
| Credits | Credit reward amount (if using incentives) |
| AI Summary | Indicates AI insights are available |
Campaign Card Actions
Click the three-dot menu on any campaign card to:
- Start Conversation — Open an AI chat to analyze campaign data (available when the campaign has responses)
- Share — Open the teammate-sharing dialog for this campaign
- Preview — Open the campaign editor
- Copy — Duplicate the campaign
- Delete — Permanently remove the campaign after a confirmation step
Filtering and Sorting
Use the controls above the card grid to filter by status (Open, Draft, Closed, Blocked, Archived) and sort by name, update date, response count, video minutes, and more.
Find What Needs Attention
Sort by Response Count (Low) to find campaigns that need more responses. Sort by Oldest Updated to spot stale drafts. Filter by Open to focus on active studies.
Creating Campaigns
Click Create Campaign to start a new study.
In current master, the create flow depends on feature flags:
- with the smart-survey flow enabled, the modal offers Manual Creation and AI-Powered Creation
- without that flag, the app can take you straight into the editor
- templates are still available, but they are primarily accessed from the separate Templates tab rather than as a third option inside the create modal
Current Dialogs and Menus
The campaign flow uses a few key popups and contextual menus:
| Surface | Current behavior |
|---|---|
| Create Campaign | Selection modal with Manual Creation and AI-Powered Creation when the smart-survey flow is enabled |
| Add Question | Category-based dropdown inside the editor |
| Saved Questions / Templates | Separate modal next to Add Question for reusing saved question patterns |
| Publish | Two-step modal with Group and Members |
| Share | Internal permissions dialog from the card menu or top nav; the current sharing UI uses Viewer and Editor roles plus General Access |
| QR code | Download QR Code modal |
| CSV export | Results export can open a modal asking whether to use the current filter |
| Participants view | Participant rows can open a contact modal, plus row menus for credit-adjustment and delete actions |
| Bulk response actions | Searchable dropdowns for Add to reel, Add to list, and Invite to Campaign |
| Editor overflow menu | Top-right menu with Copy, Preview, Publish, Close, Details, and Delete |
| Delete actions | Deleting a question or deleting a campaign uses a confirmation dialog |
| Quick Summary | Includes a share panel plus a confirmation modal when regenerating the summary |
Manual Creation
Start with a blank campaign and build your questions from scratch. Best when you need complete control over the research design.
AI-Powered Creation
Describe your research goals in plain language and let AI generate appropriate questions:
- Enter your objectives — For example: "Understand how Gen Z consumers feel about our new packaging design"
- Review AI-generated questions — Edit, remove, or reorder as needed
- Configure and launch — Set your campaign settings, incentives, and targeting
Get the Best AI-Generated Questions
Be specific about what you want to learn. Include your target audience and the topics you want to explore. The AI suggestions are starting points — always review and customize before launching.
Campaign Editor Tabs
Once you open a campaign, the top navigation bar provides these tabs:
| Tab | What It Does |
|---|---|
| Build | Add and configure questions using the drag-and-drop editor |
| Configure | Set campaign-level settings — name, dates, language, branding |
| Audience | Manage who receives the campaign — recruit, mailing lists, Vurvey Creators, People Models |
| Launch | Pre-launch checklist and confirmation — verify everything before going live |
| Results | View per-question responses with charts, video playback, and transcripts |
| Analyze | Tabular response data with sorting, filtering, and export options |
| Summary | AI-generated insights summary with key findings and themes |
Results, Analyze, and Summary tabs are disabled while the campaign is in Draft status. They become available once the campaign is launched and starts collecting responses.
Within the results area, current master also includes a nested Participants view. Older docs that flatten the post-launch experience into only Results / Analyze / Summary are incomplete.
Inside Participants, clicking a participant opens the contact modal. Each participant row also has an overflow menu that can open Adjust Credit or Delete flows.
Step-by-Step Campaign Creation Walkthrough
Whether you start from manual creation, AI-powered creation, or a template, you'll end up in the Campaign Editor where you build and refine your study. Here's a detailed walkthrough of the current editing experience.
Step 1: Name Your Campaign
After clicking Create Campaign and choosing your mode, you'll first be asked to give your campaign a name. Choose something descriptive that helps you and your team identify the study later.
Good names:
- "Q1 2026 Skincare Packaging Concept Test"
- "Gen Z Snack Preferences — Wave 3"
- "Post-Purchase Experience Survey — Premium Line"
Avoid vague names like:
- "Survey 1"
- "Test"
- "New Campaign"
Naming Convention
Establish a naming convention for your workspace. Include the date or quarter, the topic, and the audience segment. This makes it much easier to find campaigns later when your library grows.
Step 2: The Campaign Editor Layout
The campaign editor is where you build your study. It contains:
- Header bar — Campaign name, save button, preview button, and settings gear icon
- Question list (left panel) — Shows all your questions in order; drag to reorder
- Question editor (center) — Configure the selected question's text, type, options, and media
- Preview panel (right) — Live preview of how the question will appear to respondents
Step 3: Adding Questions
Click the Add Question button (or the "+" icon) at the bottom of the question list. You'll see a menu of all available question types organized by category:
- Video & Media — Video Recording, Video Upload, Picture Upload, PDF Upload
- Choice & Ranking — Choice, Multiple Choice, Ranked
- Text & Number — Short Text, Long Text, Number
- Rating — Star Rating, Slider
- Specialty — Barcode
- Stimulus — Video Playback (shows a video before the question)
Select the question type you need and it will appear in your question list.
The same area also exposes a separate Saved Questions / Question Templates modal for reusing previously saved question blocks.
Step 4: Configuring Each Question
After adding a question, configure it in the center panel:
- Question text — Write a clear, conversational prompt. Imagine you're speaking directly to the respondent.
- Description (optional) — Add context or instructions below the main question text.
- Required toggle — Mark whether the question must be answered to proceed.
- Answer options — For choice, multiple choice, and ranked questions, add your answer options here.
- Settings — Type-specific settings like time limits for video, scale ranges for sliders, etc.
Write for Real People
Avoid corporate jargon and overly formal language. Write questions as if you're having a one-on-one conversation. Instead of "Please describe your purchasing considerations," try "What goes through your mind when you're deciding what to buy?"
Step 5: Adding Media Stimuli
Any question can include a media stimulus — an image, video, or AR model that the respondent sees before answering. This is essential for:
- Concept testing — Show product mockups and ask for reactions
- Ad testing — Play a commercial and ask for feedback
- Packaging research — Display packaging designs for comparison
- Brand testing — Show logos, taglines, or creative assets
To add a stimulus:
- Select the question you want to add media to
- Click Add Media or the media icon in the question editor
- Upload your file (images, videos, or AR models)
- The stimulus will display above the question for respondents
Stimulus Best Practices
- Use high-resolution images (at least 1080px wide)
- Keep stimulus videos under 60 seconds — respondents lose attention on longer clips
- Show one concept per question for clearer feedback
- Use consistent sizing and formatting when comparing multiple concepts across questions
Step 6: Reordering Questions
Drag and drop questions in the left panel to change their order. Question order matters for research quality:
| Position | Best For |
|---|---|
| First 1-2 questions | Easy warm-up questions (demographics, simple choices) to build comfort |
| Middle questions | Core research questions — video responses, complex ratings, sensitive topics |
| Final question | Open-ended wrap-up ("Is there anything else you'd like to share?") |
Step 7: Preview Mode
Click Preview in the header to see exactly what respondents will experience. Preview mode lets you:
- Walk through the entire campaign question by question
- Test on both desktop and mobile views
- Verify that media stimuli load correctly
- Check question flow and logic
- Time yourself to estimate completion time
Always Preview Before Launch
Never launch a campaign without previewing it first. Typos, broken media, confusing question order, and unclear instructions are much easier to catch in preview than to fix after launch.
Step 8: Campaign Settings
Click the gear icon in the header to configure campaign-level settings:
| Setting | Description |
|---|---|
| Campaign name | Edit the campaign title |
| Description | Add an internal description (visible to your team only) |
| Start date | When the campaign becomes available to respondents |
| End date | When the campaign automatically closes |
| Incentive amount | Credit reward for completing the campaign |
| Branding | Apply your workspace branding (logo, colors) to the respondent experience |
| Welcome message | Custom text shown to respondents before they start |
| Thank you message | Custom text shown after they complete the campaign |
Setting Dates
If you don't set an end date, your campaign will stay open indefinitely until you manually close it. For time-sensitive research, always set an end date to ensure timely results.
Step 9: Save and Publish
Your campaign auto-saves as you work, but you can also manually save at any time using the Save button. When you're ready to collect responses:
- Click Launch (or Publish)
- Follow the Launch Flow (see Launching Campaigns below)
- Your campaign status changes from Draft to Open
Question Types — Detailed Guide
Vurvey supports a rich set of question types to capture every kind of consumer feedback. Below is a comprehensive guide to each type with examples, configuration options, and best practices.
Video & Media Questions
Video Recording
Respondents record a video answer using their device's camera. This is Vurvey's signature feature — capturing authentic, unscripted consumer voices.
Configuration options:
- Time limit — Set between 15 seconds and 5 minutes
- Required — Whether respondents must answer this question
Example question:
"Walk us through your morning skincare routine and tell us why you chose each product."
When to use:
- Capturing emotional reactions to products or concepts
- Understanding the "why" behind consumer decisions
- Getting authentic storytelling and personal narratives
- Observing product usage or unboxing experiences
Video Recording Best Practices
- Set time limits wisely — 60-90 seconds is ideal for most questions. Too short and respondents feel rushed; too long and responses become unfocused.
- Give permission to be honest — Add a note like "There are no wrong answers — we want your honest reaction."
- Be specific with prompts — Instead of "Tell us about our product," try "Show us where you keep our product and tell us how it fits into your daily routine."
- Suggest structure — "First, tell us what you liked. Then, tell us what could be better."
Common Issues with Video Recording
Q: Respondents say their camera isn't working. A: This is usually a browser permissions issue. The respondent needs to allow camera and microphone access. Suggest they try a different browser or clear their browser permissions.
Q: Videos are too short or too long. A: Adjust your time limit based on the complexity of the question. Simple reaction questions need 15-30 seconds. Detailed storytelling questions may need 2-3 minutes.
Q: Video quality is poor. A: Video quality depends on the respondent's device and internet connection. Vurvey automatically optimizes for the best quality available. Suggest respondents use a well-lit area and stable WiFi.
Video Upload
Respondents upload a pre-recorded video from their device. Use this when you want respondents to capture something in their own environment and time.
Configuration options:
- File size limit — Maximum upload size
- Required — Whether respondents must answer this question
Example question:
"Share a video of your pantry or refrigerator and tell us about your favorite products."
When to use:
- Capturing real-world product usage in natural environments
- Collecting "day in the life" footage
- Getting product demos or tutorials from consumers
- Gathering video diaries or multi-day experiences
Video Upload vs Video Recording
Use Video Upload when respondents need time to film something specific (their kitchen, a product shelf, an experience). Use Video Recording when you want immediate, spontaneous reactions recorded in-the-moment during the survey.
Picture Upload
Respondents upload one or more images from their device.
Configuration options:
- Number of images — Minimum and maximum images allowed
- Required — Whether respondents must answer this question
Example question:
"Take a photo of the product packaging that caught your eye most recently in-store."
When to use:
- Collecting product shelf photos or store displays
- Getting screenshots of digital experiences
- Capturing before/after comparisons
- Understanding how products are used or stored in real homes
Getting Better Photos
Tell respondents exactly what to photograph and from what angle. "Take a close-up photo of the ingredient label" gets much better results than "Take a photo of the product."
PDF Upload
Respondents upload a PDF document.
Configuration options:
- File size limit — Maximum upload size
- Required — Whether respondents must answer this question
Example question:
"Upload a screenshot or document showing a recent receipt from a purchase in this product category."
When to use:
- Collecting receipts, invoices, or other documentation
- Gathering written feedback in document form
- Supporting proof-of-purchase verification
- Collecting detailed written responses that benefit from formatting
Choice & Ranking Questions
Choice (Single Select)
Respondents pick one option from a list. Use this for mutually exclusive answers.
Configuration options:
- Options list — Add, edit, remove, and reorder choices
- "Other" option — Allow respondents to type a custom answer
- Randomize order — Shuffle option order to reduce position bias
- Required — Whether respondents must answer this question
Example question:
"Which of the following best describes your skin type?"
Options: Oily, Dry, Combination, Normal, Sensitive
When to use:
- Demographic questions (age range, income bracket)
- Preference selection ("Which concept do you prefer?")
- Classification questions ("Which category best describes...?")
- Yes/No questions with specific answer options
Designing Choice Questions
- Keep the number of options between 3-7 for easy scanning
- Make options mutually exclusive — each respondent should clearly fit only one
- Include "Other" or "None of the above" when your list may not be exhaustive
- Use Randomize order to prevent the first option from being chosen disproportionately
Multiple Choice (Multi Select)
Respondents can select multiple options from a list. Use this for questions where more than one answer can apply.
Configuration options:
- Options list — Add, edit, remove, and reorder choices
- "Other" option — Allow respondents to type a custom answer
- Minimum selections — Require respondents to pick at least N options
- Maximum selections — Limit how many options can be selected
- Randomize order — Shuffle option order to reduce position bias
- Required — Whether respondents must answer this question
Example question:
"Which of these factors influence your skincare purchases? (Select all that apply)"
Options: Price, Brand reputation, Ingredients, Packaging, Online reviews, Friend/family recommendations, Social media influencers, Dermatologist recommendation
When to use:
- Understanding which factors or attributes matter
- Identifying product features that resonate
- Collecting information about multiple behaviors or preferences
- "Select all that apply" style questions
Multiple Choice vs Choice
Use Choice (single select) when answers are mutually exclusive ("What is your age range?"). Use Multiple Choice (multi select) when multiple answers can be true simultaneously ("Which social media platforms do you use?").
Ranked (Drag and Drop)
Respondents drag and drop items to rank them in order of preference or importance.
Configuration options:
- Items list — Add, edit, remove items to be ranked
- Required — Whether respondents must answer this question
Example question:
"Rank these product features from most important to least important:"
Items: Effectiveness, Price, Natural ingredients, Brand reputation, Packaging design
When to use:
- Understanding relative priorities and tradeoffs
- Comparing feature importance
- Ranking brand preferences
- Determining which attributes drive purchase decisions
Ranked Question Best Practices
- Limit to 5-7 items — Ranking more than 7 items becomes cognitively taxing and results become unreliable
- Use clear, concise labels — Each item should be instantly understandable
- Make items comparable — All items should be in the same category (all features, all brands, all benefits)
- Consider a follow-up video question — After ranking, ask "Tell us why you ranked [top choice] first" to capture the reasoning
Text & Number Questions
Short Text
Respondents enter a brief text response (typically one sentence or a few words).
Configuration options:
- Placeholder text — Example text shown in the input field
- Character limit — Maximum characters allowed
- Required — Whether respondents must answer this question
Example question:
"In one sentence, what is the first thing that comes to mind when you hear our brand name?"
When to use:
- Top-of-mind awareness ("What brand comes to mind when you think of...?")
- Quick word associations
- Brief feedback or suggestions
- Name or label suggestions
Long Text
Respondents enter a detailed text response (paragraph-length).
Configuration options:
- Placeholder text — Example text shown in the input field
- Character limit — Maximum characters allowed
- Required — Whether respondents must answer this question
Example question:
"Describe your ideal skincare routine and any pain points you currently experience. What products work well for you, and where do you feel there are gaps?"
When to use:
- Detailed open-ended feedback
- Experience descriptions
- Product improvement suggestions
- Capturing stories and narratives in written form
When to Use Text vs Video
Choose video when you want emotion, authenticity, and non-verbal cues. Choose text when respondents need time to think, when the topic is sensitive, or when you need responses that are easy to search and quantify. Many campaigns benefit from using both — a text question for quick thoughts followed by a video question for deeper exploration.
Number
Respondents enter a numeric value.
Configuration options:
- Minimum value — Lowest allowed number
- Maximum value — Highest allowed number
- Placeholder text — Example text shown in the input field
- Required — Whether respondents must answer this question
Example question:
"How many skincare products do you use daily?"
When to use:
- Collecting frequency data ("How many times per week...?")
- Gathering quantity information ("How many products...?")
- Getting specific numeric values (spending amounts, counts)
- Age or household size questions
Rating Questions
Star Rating
Respondents rate on a star scale (typically 1-5 stars).
Configuration options:
- Number of stars — Set the scale (default is 5)
- Label for low end — Text for the lowest rating (e.g., "Poor")
- Label for high end — Text for the highest rating (e.g., "Excellent")
- Required — Whether respondents must answer this question
Example question:
"Rate your overall satisfaction with our product on a scale of 1-5 stars."
1 star = Very Dissatisfied, 5 stars = Very Satisfied
When to use:
- Overall satisfaction measurement
- Product quality ratings
- Experience ratings
- Quick evaluations where a simple scale works
Star Rating Best Practices
- Always label your endpoints so respondents know what 1 star and 5 stars mean
- Use the same scale consistently throughout your campaign
- Follow up star ratings with a video or text question asking "Why did you give that rating?"
- Star ratings are great for tracking trends over time — use the same question across multiple campaign waves
Slider
Respondents slide to select a value on a continuous range.
Configuration options:
- Minimum value — Start of the range (e.g., 0)
- Maximum value — End of the range (e.g., 100)
- Step size — Increment between selectable values
- Label for low end — Text for the minimum (e.g., "Not at all likely")
- Label for high end — Text for the maximum (e.g., "Extremely likely")
- Required — Whether respondents must answer this question
Example question:
"On a scale of 0-100, how likely are you to recommend this product to a friend?"
0 = Not at all likely, 100 = Extremely likely
When to use:
- Net Promoter Score (NPS) style questions
- Measuring intensity of feelings or opinions
- Price sensitivity ("What is the most you'd pay?")
- Any question where you want a more granular range than star ratings
Slider vs Star Rating
Use Star Rating for simple, quick evaluations (satisfaction, quality). Use Slider when you need more granular data or a specific numeric range (NPS, willingness to pay, likelihood). Sliders give you more precise data but take slightly longer for respondents.
Specialty Questions
Barcode
Respondents scan a product barcode using their device camera.
Configuration options:
- Required — Whether respondents must answer this question
Example question:
"Scan the barcode of the product you use most frequently in this category."
When to use:
- Product identification and verification
- Shopping behavior research (scan what's in the cart)
- Pantry studies (scan products at home)
- Competitive analysis (identify which brands consumers actually buy)
Barcode Scanning Tips
- Tell respondents where to find the barcode ("Look for the barcode on the bottom of the package")
- Not all products have scannable barcodes — always make barcode questions optional or provide an alternative (like a photo upload)
- Barcode scanning works best with good lighting and a steady hand
Media Stimuli
Any question can include an image, video, or AR model as a stimulus — perfect for concept testing, ad testing, or packaging research.
Video Playback (Stimulus)
Show a video before a question that respondents must watch before answering.
Example usage:
Show a 30-second product demo video, then ask: "What was your initial reaction to this product demonstration? What stood out to you?"
When to use:
- Ad testing — show a commercial and measure reactions
- Concept demos — show how a product works
- Training or education — show a process and test comprehension
- Competitive analysis — show competitor content and gather comparisons
Question Design for Better Insights
- Video questions: Keep prompts specific, suggest a time limit, and give permission to be honest. Ask for stories and examples rather than yes/no answers.
- Rating questions: Use consistent scales and define the endpoints clearly.
- Question order: Start easy, put sensitive questions in the middle, and end with an open feedback opportunity.
- Mix question types: Combine quantitative (ratings, choices) with qualitative (video, text) for both data and depth.
- One concept per question: Don't ask about multiple things in a single question — split them up.
Launching Campaigns
Launch Flow
Click Publish to open the launch modal. The current launch flow has two steps:
- Group — Configure your audience targeting and campaign settings
- Members — Select who receives the campaign
Step 1: Group Configuration
In the Group step, you configure:
| Setting | Description |
|---|---|
| Audience type | Choose between Populations, Mailing List, or Vurvey Creators |
| Response goal | How many responses you want to collect |
| Start date/time | When the campaign opens for responses |
| End date/time | When the campaign automatically closes |
| Incentive | Credit reward amount per completed response |
Step 2: Members Selection
In the Members step, you choose exactly who will receive the campaign invitation, based on the audience type you selected:
For Populations (AI-generated profiles):
- Select from available AI population segments
- Choose the number of synthetic respondents
- Great for testing campaigns before live launch
For Mailing List:
- Select from lists, segments, or individual contacts in your People section
- Upload new contacts or choose existing groups
- Filter by demographics, past participation, or custom attributes
For Vurvey Creators:
- Access Vurvey's network of 3+ million qualified research participants
- Filter by demographics, interests, and location
- Set response quotas for specific demographic groups
Audience Targeting
When launching, you can target four types of audiences:
| Audience Type | Description |
|---|---|
| Populations | AI-generated consumer profiles for synthetic testing |
| Mailing List | Contacts from your People section (lists, segments, or individual contacts) |
| Vurvey Creators | Vurvey's network of qualified research participants |
| People Models | Synthetic respondents based on custom molds and consumer profiles |
Choosing the Right Audience
- Populations — Use for testing and iteration. Free and instant, but responses are AI-generated. Perfect for validating question design before spending budget on real respondents.
- Mailing List — Use when you have an existing customer list or panel. Best for brand-specific research where you need feedback from your actual customers.
- Vurvey Creators — Use when you need fresh perspectives from a large, diverse audience. Best for general market research and reaching demographics you don't have in-house.
- People Models — Use AI-generated personas with specific demographic and psychographic profiles. Ideal for targeted synthetic testing with precise audience characteristics.
Sharing Your Campaign
This external-sharing area is separate from the internal Share permission dialog used for teammate access.
After launching, you can share your campaign through multiple channels:
| Method | How It Works |
|---|---|
| Direct link | Copy the campaign URL and share via email, Slack, or any messaging platform |
| QR code | Generate a scannable QR code for print materials, events, or in-store displays |
| Email invitation | Send invitations directly from Vurvey to your mailing list |
| Embed | Get an embed code to place the campaign on your website |
QR Codes for In-Person Research
QR codes are powerful for in-store or event-based research. Print them on product displays, receipts, or signage. Include a short call-to-action: "Scan to share your experience and earn rewards."
Pre-Launch Checklist
Before launching, verify:
- All questions are configured and reviewed
- Campaign settings and incentives are finalized
- Targeting is set to reach the right audience
- You've tested with Preview mode on both mobile and desktop
- Start and end dates are correct
- Media stimuli load correctly (images, videos)
- Welcome and thank-you messages are written
- Required vs optional questions are set correctly
- Question order makes logical sense
Double-Check Before You Launch
Once a campaign is Open, you cannot add or remove questions — only edit question text and settings. Build and test your campaign completely before launching. If you need to make structural changes after launch, you'll need to close the campaign, duplicate it, make changes, and relaunch.
After Launch
Once your campaign is Open:
- Monitor responses as they come in
- Check response quality early to catch issues
- Watch for technical problems
- Close the campaign when you've reached your response goals
Post-Launch Monitoring Tips
| What to Check | Why It Matters | When to Check |
|---|---|---|
| Response rate | Low rates may indicate targeting, incentive, or length issues | Daily for the first 3 days |
| Completion rate | High drop-off at a specific question signals a problem | After the first 20 responses |
| Video quality | Ensure respondents understand video prompts | After the first 10 responses |
| Response variety | If everyone gives the same answer, your question may be leading | After the first 30 responses |
| Time to complete | Campaigns over 15 minutes have significantly lower completion rates | After the first 10 responses |
Campaign Results
Viewing Responses
The Results tab shows summary statistics — total responses, completion rate, average duration, and total video minutes collected. Click any individual response to see:
- Video playback with speed controls and download options
- AI-generated transcript with timestamps you can click to jump to specific moments
- All question answers and response metadata
Response Cards
Each response appears as a card showing the respondent's name (or anonymous ID), completion date, and a thumbnail preview of their video. Cards are sorted by most recent by default.
When you bulk-select responses, the current action bar exposes searchable dropdown flows for Add to reel, Add to list, and Invite to Campaign.
Member Participation Status
When tracking campaign participation, members can have one of three statuses:
| Status | Description |
|---|---|
| Invited | Campaign invitation sent but not yet started |
| Partial | Started the campaign but has not completed all questions |
| Completed | Finished all questions and submitted responses |
These statuses help you track response progress and identify who needs follow-up reminders.
Video Playback
When you click into an individual response, the video player provides:
| Feature | Description |
|---|---|
| Speed controls | Play at 0.5x, 1x, 1.5x, or 2x speed for efficient review |
| Download | Download the video file for external use or presentations |
| Fullscreen | Expand to fullscreen for detailed viewing |
| Transcript sync | The transcript highlights in real-time as the video plays |
| Timestamp clicking | Click any timestamp in the transcript to jump to that moment |
Review Videos Efficiently
Use 1.5x speed for initial review to get through responses quickly. Switch to 1x when you find compelling moments you want to capture as highlights. Use the transcript to scan for keywords before watching the full video.
AI Transcripts
Every video response is automatically transcribed by AI. Transcripts include:
- Full text of everything the respondent said
- Timestamps at regular intervals (click to jump to that moment in the video)
- Speaker identification for multi-person videos
- Searchable text — use your browser's Find function to locate specific words or phrases
AI Insights
AI automatically analyzes your campaign data and surfaces:
- Overall themes and patterns across all responses
- Sentiment analysis showing how respondents feel
- Key findings summarized for quick review
- Question-level breakdowns highlighting common themes and notable outliers
How AI Insights Work
After your campaign collects enough responses (typically 5-10 minimum), Vurvey's AI processes all the data — video transcripts, text answers, ratings, and choices — to surface patterns you might miss when reviewing responses individually.
| Insight Type | What You'll See |
|---|---|
| Themes | Common topics and ideas that appear across multiple responses |
| Sentiment | Whether responses are positive, negative, neutral, or mixed — overall and per question |
| Key findings | The most important takeaways, written as executive-ready bullet points |
| Question breakdowns | Per-question summaries showing common answers, outlier responses, and statistical distributions |
| Quotes | Notable verbatim quotes from respondents that illustrate key themes |
Getting the Best AI Insights
- More responses = better insights — AI analysis improves significantly after 20+ responses
- Video responses produce richer insights than text-only answers
- Specific questions get specific insights — vague questions produce vague AI analysis
- Wait for processing — AI insights may take a few minutes after new responses come in
Creating Highlights
Mark compelling moments from video responses as highlights. You can create them from the video player, select text in the transcript, or let AI suggest the best moments automatically.
Manual Highlight Creation
- While watching a video response, click Create Highlight when you see a compelling moment
- Set the start and end timestamps for the clip
- Add a title or tag for the highlight
- Save — the highlight is now available for Magic Reels and sharing
AI-Suggested Highlights
Vurvey's AI can automatically identify the most compelling moments in video responses based on:
- Emotional intensity
- Key insights or revelations
- Clear articulation of opinions
- Unique perspectives or stories
Using Highlights
Highlights can be:
- Added to Magic Reels for stakeholder presentations
- Shared individually via link
- Downloaded as video clips
- Tagged and organized for later reference
Exporting Data
Export campaign results in multiple formats — CSV for spreadsheet analysis, video downloads, transcript exports, and PDF reports for stakeholders.
| Export Format | What's Included | Best For |
|---|---|---|
| CSV | All structured data (ratings, choices, text answers, metadata) | Spreadsheet analysis, data dashboards |
| Video downloads | Individual or bulk video response files | Presentations, archives |
| Transcript exports | Text files of all video transcripts | Text analysis, quote mining |
| PDF reports | Formatted summary with charts, quotes, and AI insights | Stakeholder presentations, executive summaries |
Export Tips
- Export CSV data to create custom charts and cross-tabulations in Excel or Google Sheets
- Download videos before archiving campaigns if you want permanent copies
- PDF reports are great for sharing with stakeholders who don't have Vurvey access
- Use transcript exports for detailed qualitative coding in tools like NVivo or Dedoose
Templates
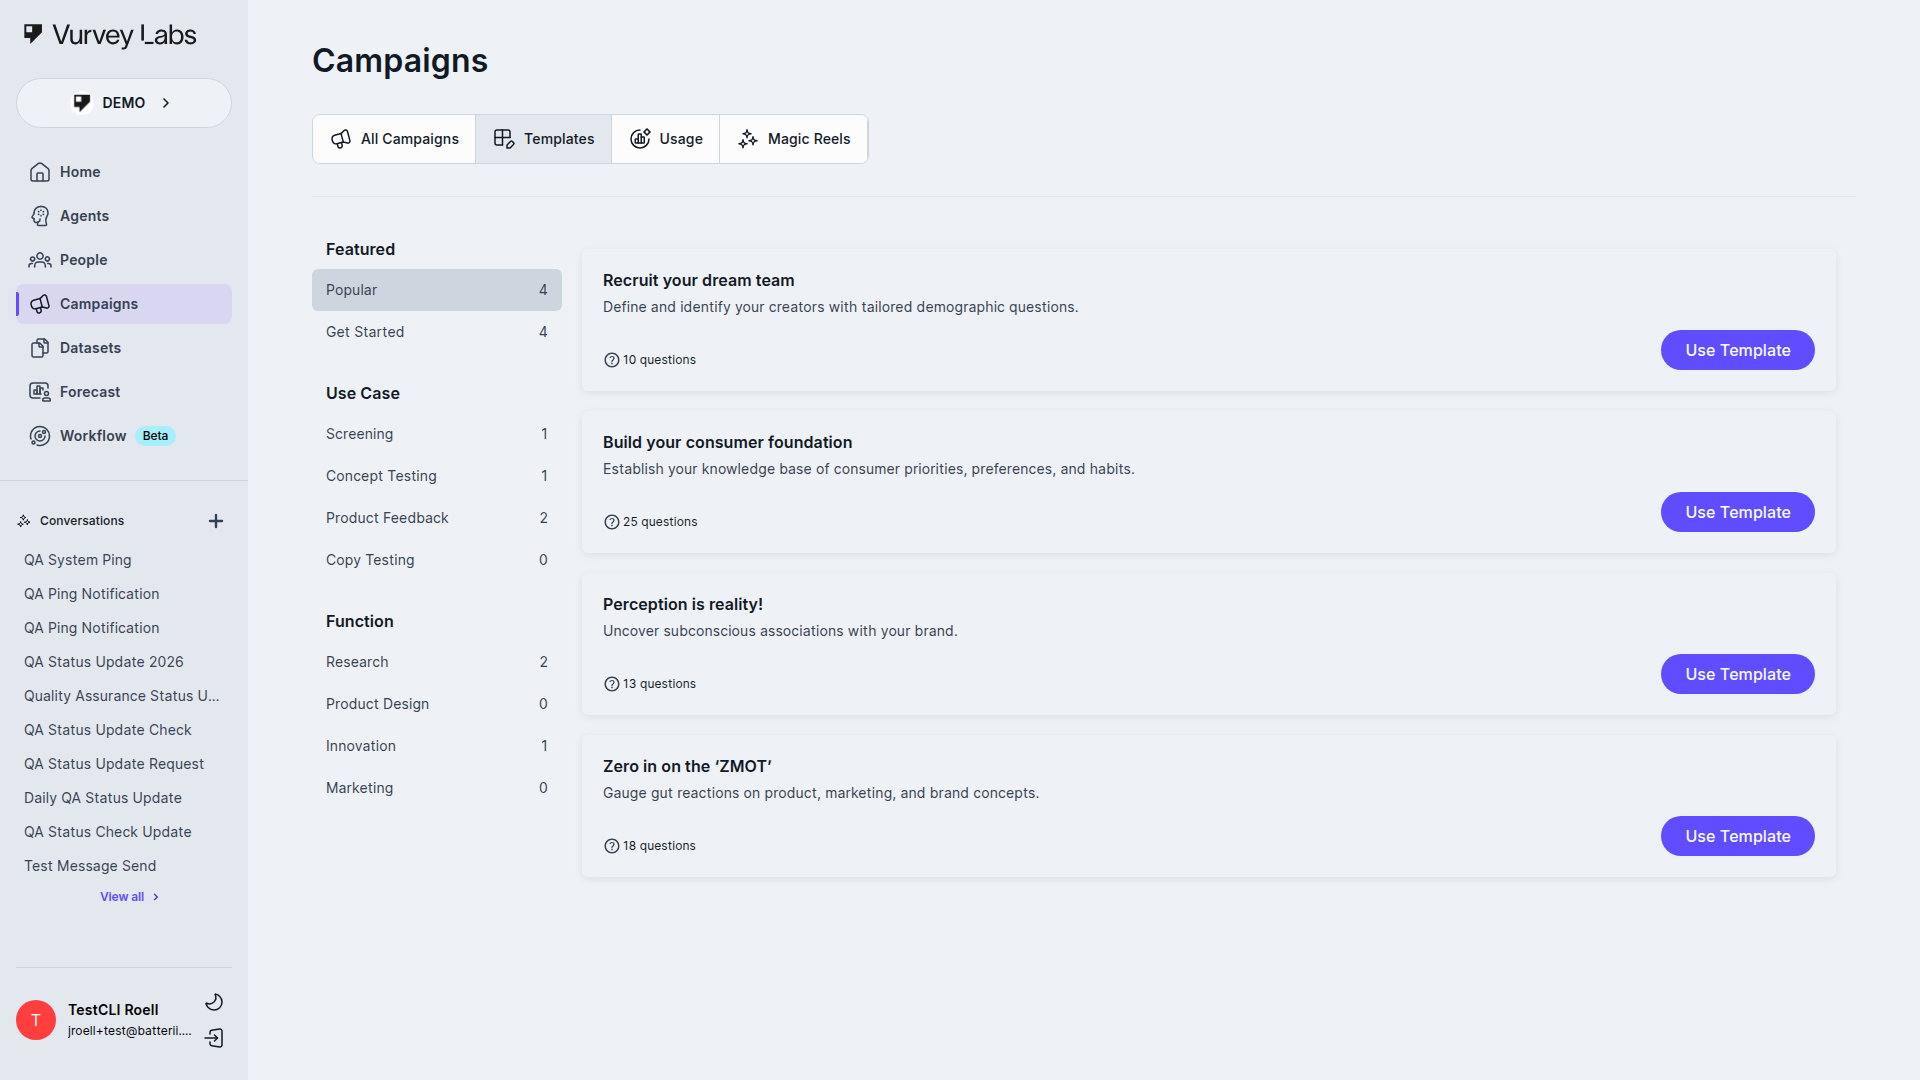
Browse pre-built campaign templates organized by category. Each template shows a headline, description, question count, suggested incentive, and estimated completion time.
Templates are starting points. After selecting one, customize the questions, adjust incentives, add your branding, and test thoroughly before launching.
Template Categories
| Category | Use Cases |
|---|---|
| Concept Testing | Test product concepts, packaging designs, ad creatives |
| Brand Research | Brand perception, awareness, competitive positioning |
| Product Feedback | Post-purchase experience, product satisfaction, feature requests |
| Market Exploration | Category trends, unmet needs, white-space discovery |
| Customer Experience | Journey mapping, touchpoint evaluation, NPS |
| Ad & Creative Testing | Pre-launch ad testing, creative feedback, messaging effectiveness |
How to Use Templates Effectively
- Browse by category to find templates relevant to your research objective
- Preview the questions to understand the research flow
- Click "Use Template" to create a campaign from it
- Customize everything — change question text, add/remove questions, update options, and add your own media stimuli
- Don't launch the template as-is — templates are starting points, not finished campaigns
Use Case
Need quick feedback on three product concepts before a board meeting? Start with a "Concept Test" template, upload your concept images, and launch to your target panel — all in under an hour.
Usage
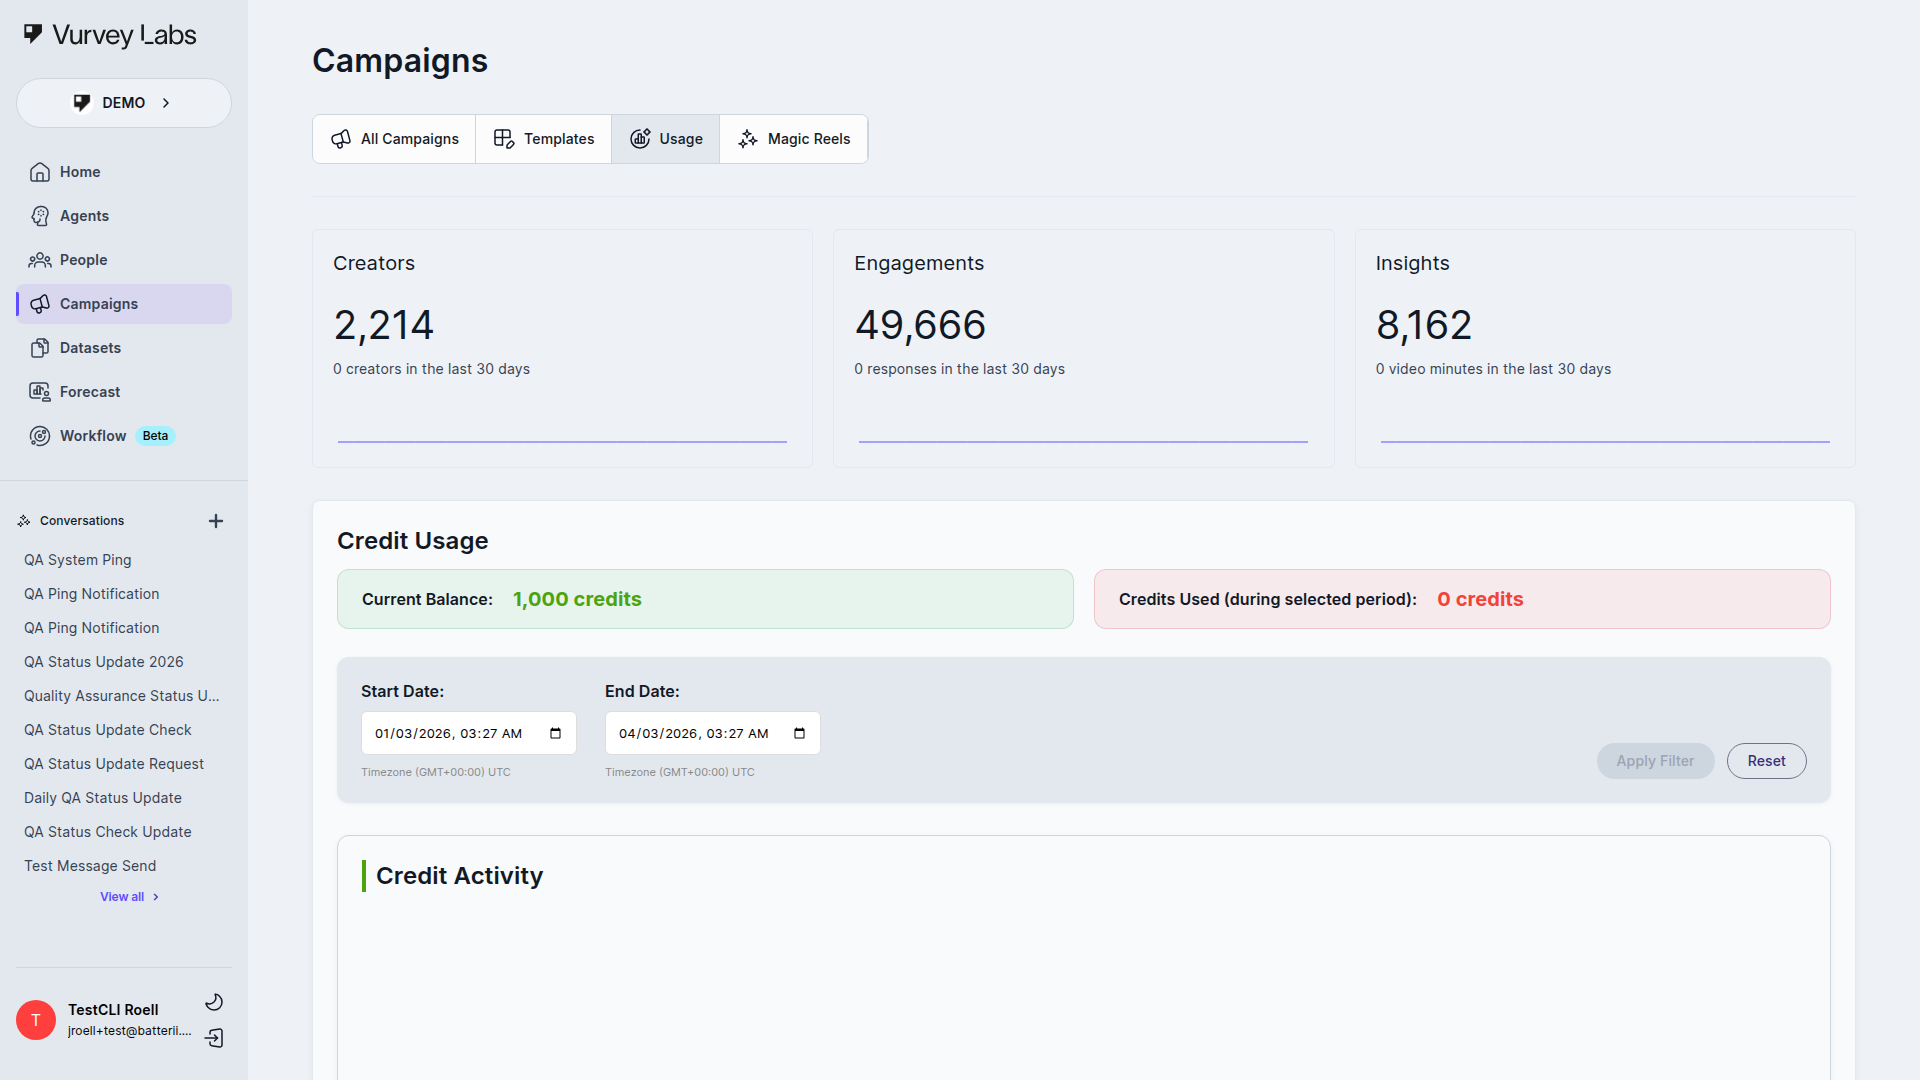
Track your workspace activity and credit consumption. The Usage tab shows your current credit balance, a credit activity chart over time, and detailed transaction history.
What Are Credits?
Credits are the currency used within Vurvey to pay for survey responses. Every workspace has a credit balance, and credits are deducted automatically each time a participant (human or AI agent) answers a survey question.
Key Concept
Credits are charged per answer, not per survey or per response. If a survey has 10 questions and a participant answers all 10, that counts as 10 separate credit deductions.
The Credit Formula
The estimated cost of running a survey is:
Total Credits = Number of Participants x Credit Rate x Number of Questions
For example, if you run a survey with 50 participants, a credit rate of 338 per answer, and 5 questions: 50 x 338 x 5 = 84,500 credits.
Two Types of Credit Rates
| Respondent Type | Description | Default Rate |
|---|---|---|
| Creator (Human) | Real people from the Vurvey Creator network or recruited participants | 338 credits per answer |
| Agent (AI) | AI-generated responses from Vurvey Agents or People Models | 1 credit per answer |
Which Response Sources Are Charged?
| Response Source | Rate Applied | Description |
|---|---|---|
| Vurvey Creators | Creator rate (338) | Responses from the Vurvey Creator network |
| Recruits | Creator rate (338) | Responses from externally recruited participants |
| Agents | Agent rate (1) | Responses generated by AI agents |
| People Models | Agent rate (1) | Responses generated by AI People Models |
| Email Invites | Not charged | Responses from direct email invitations |
Non-Billable Questions
Some survey questions are marked as "non-billable" internally (e.g., system-generated or metadata questions). Answers to non-billable questions are never charged credits.
When Are Credits Deducted?
Credits are deducted automatically and in real time as answers are submitted. The credit rate applied to a survey is determined by when the survey was first opened — all answers within the same survey use that rate, even if rates change later.
Credit Reversals
If an answer is deleted (e.g., a response is removed by an admin), the credits originally deducted for that answer are automatically refunded to the workspace balance.
What Happens When Credits Run Out?
By default, a survey cannot be opened if the workspace has zero or negative credits. Surveys that are already open will continue to collect responses even if the balance reaches zero. Some enterprise workspaces may have "Allow Negative Credits" enabled to bypass this check.
What You Can See on the Usage Page
- Current Balance — Your workspace's credit balance displayed prominently
- Credits Used — Deductions during the selected time period
- Credit Activity Chart — How the balance has changed over time, with date range filtering
- Transaction History — A detailed table of all credit transactions (visible to support/enterprise users) including date, amount, reason, and associated survey
Estimate Before You Launch
Use the credit formula (Participants x Rate x Questions) to estimate costs before launching. Use AI populations (1 credit/answer) for initial testing rounds — it's a cost-effective way to validate your questions before going live with real respondents (338 credits/answer).
Magic Reels
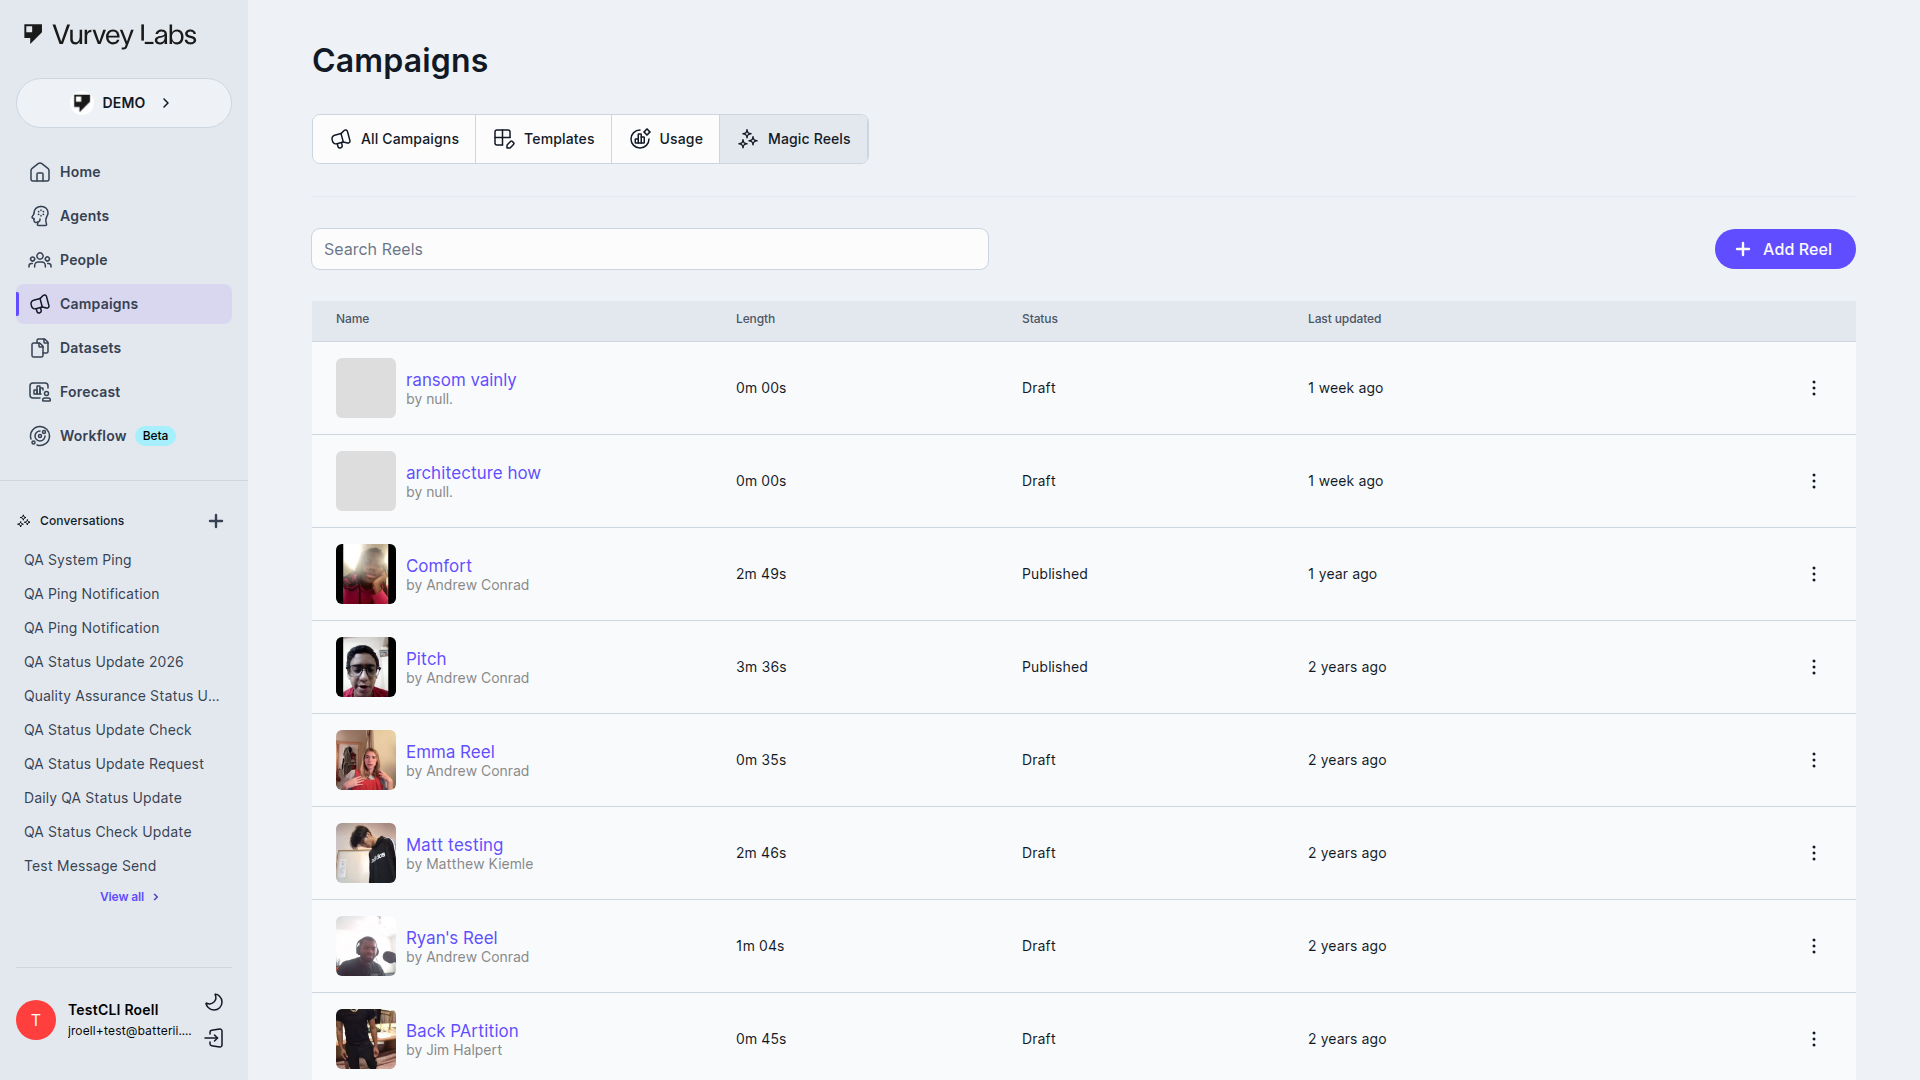
Magic Reels are AI-powered video highlight compilations created from your campaign responses. They're perfect for sharing consumer voices with stakeholders, creating presentation-ready content, or building a library of authentic customer testimonials.
Reel Status
| Status | Meaning |
|---|---|
| Published | Ready to view and share |
| Draft | Not yet published |
| Processing | Video being generated |
| Failed | Generation encountered an error |
| Unpublished Changes | Has updates that haven't been published yet |
Creating a Reel
- Click Add Reel
- Select the campaign(s) to draw clips from
- Choose AI-generated (AI picks the best moments) or manual (you select clips)
- Preview and edit — trim clips, reorder, add or remove
- Click Publish when ready
Editing a Reel
After creating a reel (AI-generated or manual), you can:
| Action | Description |
|---|---|
| Trim clips | Adjust the start and end points of each clip |
| Reorder clips | Drag and drop to change the narrative flow |
| Add clips | Include additional highlights from the campaign |
| Remove clips | Delete clips that don't fit |
| Add title cards | Insert text screens between clips for context |
Sharing Reels
Published reels can be shared via direct link, embedded in websites, downloaded as video files, or shared with your team.
| Sharing Method | Best For |
|---|---|
| Direct link | Quick sharing via email or Slack |
| Embed code | Adding to internal wikis, presentations, or websites |
| Video download | Offline presentations, social media, or archiving |
| Team sharing | Making available to other workspace members |
Effective Highlight Reels
- Keep reels under 3 minutes for maximum engagement
- Include diverse clips for a representative sample
- Focus on emotional moments that resonate with stakeholders
- Create separate reels for different audiences (executives, product team, marketing)
- Share while insights are fresh
Campaign Lifecycle
A campaign flows through these statuses:
Draft → Open → Closed → Archived
         ↓
Blocked → Open (resume) or Closed| Transition | What Happens |
|---|---|
| Draft → Open | Campaign goes live and starts collecting responses |
| Open → Closed | Campaign stops accepting new responses |
| Open → Blocked | Campaign is temporarily paused |
| Blocked → Open | Campaign resumes collecting responses |
| Closed → Archived | Campaign moves to long-term storage |
Managing Campaign Status
| Action | How to Do It |
|---|---|
| Launch | Click "Launch" from the campaign editor and complete the launch flow |
| Close | Open the campaign, click the status dropdown, and select "Closed" |
| Block | Open the campaign, click the status dropdown, and select "Blocked" |
| Resume | From a Blocked campaign, click the status dropdown, and select "Open" |
| Archive | From a Closed campaign, click the three-dot menu and select "Archive" |
About Deleting vs Archiving
Deleting a campaign permanently removes all data — questions, responses, videos, insights, and highlights. This cannot be undone. Archiving preserves everything but removes the campaign from your active view. Always archive instead of delete unless you're absolutely certain you won't need the data.
Common Workflows
Test Campaign Questions Before Going Live
- Create your campaign and add all questions
- In the launch flow, target an AI Population matching your audience demographics
- Collect simulated responses and review — are the questions clear? Are you getting useful variety?
- Refine questions based on the AI feedback
- Relaunch to real participants with confidence
Launch a Video Survey to Hear from Gen Z Consumers
- Create a campaign from objectives: "Understand Gen Z preferences for sustainable packaging"
- Include a mix of video questions ("Tell us about a recent purchase where packaging influenced your decision") and rating questions
- Target a segment of Gen Z consumers from your People section
- Monitor responses as they come in
- Use AI Insights to surface themes and create a Magic Reel for your stakeholders
Create a Shareable Highlight Reel from Campaign Responses
- After your campaign closes, go to Magic Reels
- Click Add Reel and select your campaign
- Let AI pick the best clips or hand-select your favorites
- Edit the reel — trim clips, reorder for narrative flow
- Publish and share the link with your team or clients
Run an A/B Concept Test
- Create a campaign with stimulus-based questions
- For Question 1: Add Concept A as a media stimulus, then ask for reactions (video + rating)
- For Question 2: Add Concept B as a media stimulus, then ask for reactions (video + rating)
- Add a final comparison question: "Which concept did you prefer and why?" (video)
- Launch to your target audience
- Compare AI Insights across the two concepts to identify the winner
Conduct a Multi-Wave Tracking Study
- Create your first campaign with consistent key questions (NPS, satisfaction, brand perception)
- Launch Wave 1 to your target audience
- After collecting results, duplicate the campaign for Wave 2
- Make only minimal changes (update dates, refresh stimuli if needed)
- Launch Wave 2 to the same audience segment
- Compare results across waves to identify trends over time
Build a Stakeholder Presentation from Campaign Data
- Review AI Insights for the key findings
- Export a PDF report for the data summary
- Create a Magic Reel with the most compelling video clips
- Download selected video clips for your presentation slides
- Export CSV data for any custom charts you need
- Combine everything into a presentation that blends data with authentic consumer voices
Best Practices
Campaign Design
| Principle | Why It Matters |
|---|---|
| Keep it under 15 minutes | Completion rates drop significantly for longer campaigns |
| Start with easy questions | Build respondent comfort before asking for video or sensitive info |
| Mix question types | Combine quantitative (ratings, choices) with qualitative (video, text) |
| One topic per question | Double-barreled questions confuse respondents and muddy your data |
| Use conversational language | Write questions as if you're talking to a friend, not writing an academic paper |
| Test before launch | Use AI Populations or a small pilot group to catch issues early |
Writing Better Questions
The BEST Framework for Questions
- Brief — Keep questions under 25 words when possible
- Explicit — Be specific about what you're asking
- Simple — Use everyday language, avoid jargon
- Thoughtful — Consider how the question will be interpreted by diverse audiences
Good question examples:
- "Show us how you organize your bathroom products and tell us which ones you reach for first each morning."
- "What's the one thing we could change about this product that would make you love it?"
- "Rate how likely you are to buy this product based on what you've seen today."
Avoid these mistakes:
- Leading questions: "Don't you agree this packaging is better?" → "Which packaging do you prefer?"
- Double-barreled: "How satisfied are you with the price and quality?" → Ask as two separate questions
- Jargon: "Rate the SKU's shelf presence" → "How noticeable is this product on a store shelf?"
- Vague: "How do you feel about products?" → "How do you feel about our new moisturizer line?"
Video Response Quality
| Tip | Details |
|---|---|
| Be specific in your prompt | "Walk us through your morning routine" gets better responses than "Tell us about your routine" |
| Suggest a structure | "First, show us the product. Then tell us what you like. Finally, tell us what you'd change." |
| Set the right time limit | 60-90 seconds for most questions; 15-30s for quick reactions; 2-3 min for detailed walkthroughs |
| Give permission to be authentic | "There are no wrong answers" encourages genuine responses |
| Provide examples | Show a sample response or describe what a great answer looks like |
Maximizing Response Rates
| Strategy | Expected Impact |
|---|---|
| Competitive incentives | 2-3x improvement in response rates |
| Short campaign length | Under 10 minutes gets the highest completion |
| Clear subject line/invitation | Tell respondents exactly what to expect |
| Mobile-friendly design | Over 60% of respondents complete on mobile devices |
| Send reminders | Follow up with non-responders after 48 hours |
| Deadline urgency | "Closes Friday" creates healthy urgency |
| Personalized invitations | Using the respondent's name increases open rates |
Troubleshooting
Low Response Rates
- Check your incentive — Is it competitive for your audience?
- Review campaign length — Shorter surveys get higher completion rates
- Verify targeting — Is the right audience receiving the invitation?
- Test the link — Make sure the campaign URL works
- Send reminders — Follow up with non-responders
- Check your invitation text — Is the subject line compelling? Is the purpose clear?
- Review the time of day — Send invitations when your audience is most likely to engage (mid-morning or early evening for consumers)
AI Insights Not Generating
- Wait for processing — AI needs time after responses are submitted
- Most features require at least 5-10 responses
- Refresh the page — insights may have loaded
- Videos must be transcribed before AI can analyze them
- Check if your campaign has video responses — text-only campaigns generate less detailed insights
Campaign Won't Launch
- Check that all required fields are completed
- Verify at least one question is added
- Review date ranges and targeting settings
- Confirm incentives are properly configured (if using payments)
- Make sure you have sufficient credits in your workspace
- Verify your workspace has permissions to launch campaigns
Video Responses Not Playing
- Check your internet connection — Video requires a stable connection to stream
- Try a different browser — Some older browsers may have compatibility issues
- Clear your browser cache — Cached data can sometimes interfere with playback
- Check if the video is still processing — New responses may take a few minutes to process
- Download the video — If streaming doesn't work, try downloading and playing locally
Respondents Can't Access the Campaign
- Verify the campaign is Open — Draft and Closed campaigns don't accept responses
- Check the link — Make sure you're sharing the correct campaign URL
- Review start/end dates — The campaign may not have started yet or may have already closed
- Check targeting — If using a mailing list, verify the respondent is included
- Browser compatibility — Recommend Chrome, Safari, or Firefox for the best experience
High Drop-Off Rate
- Identify the drop-off point — Look at which question respondents abandon
- Simplify that question — Is it too complex, too personal, or too long?
- Review campaign length — Consider removing or combining questions
- Check media loading — Large video or image stimuli may be slow to load on mobile
- Review mobile experience — Preview on mobile to ensure a smooth experience
Magic Reel Generation Failed
- Check clip availability — Ensure the source videos are still accessible
- Try fewer clips — Large reels with many clips can sometimes fail
- Retry generation — Transient errors may resolve on a second attempt
- Check video formats — Unusual video formats from respondent uploads may cause issues
Duplicate Responses
- Check your targeting — Some respondents may have received the campaign multiple times through different lists
- Review sharing — If you shared the link publicly, the same person may have responded more than once
- Use respondent deduplication — Vurvey automatically detects and flags potential duplicates based on device and account information
Exported Data Looks Incorrect
- Check the date range — Exports may include only responses within a specific window
- Verify column mapping — CSV columns map to question titles, which may have been edited after responses were collected
- Re-export — If data appears corrupted, try exporting again
- Check for special characters — Respondent text with special characters may display differently in some spreadsheet software
Credits Running Low
- Check your usage page for a detailed breakdown of where credits are going
- Reduce incentives for testing campaigns (use AI Populations instead)
- Set response limits to prevent over-spending on a single campaign
- Contact your workspace admin to request additional credits
- Prioritize — Focus credits on your highest-priority research
Frequently Asked Questions
Can I edit a campaign after it's been launched?
You can edit question text, descriptions, and some settings after launch. However, you cannot add or remove questions, change question types, or restructure the campaign. If you need to make structural changes, close the campaign, duplicate it, make your changes, and relaunch.
How many questions should my campaign have?
For best results, aim for 5-12 questions with a mix of types. Campaigns with fewer than 5 questions may not capture enough depth. Campaigns with more than 15 questions see significantly higher drop-off rates. If you have 2-3 video questions, keep the total question count lower (8-10) since video questions take more time.
What's the ideal incentive amount?
It depends on your audience and campaign length. For a 5-10 minute campaign:
- General consumers: $5-15
- Professional/expert audiences: $20-50
- Highly specialized respondents: $50-100+ Higher incentives improve response rates but also attract lower-quality "speed runners." Balance incentive amount with response quality requirements.
Can respondents save and come back later?
Yes, respondents can pause and resume a campaign. Their progress is saved automatically. They can pick up where they left off using the same link.
How long does AI processing take?
- Transcription: 2-5 minutes per video
- AI Insights: 10-30 minutes after enough responses are collected
- Magic Reels: 5-15 minutes depending on length and complexity These times may vary based on current system load.
Can I use campaigns for internal employee research?
Absolutely. Many organizations use Vurvey campaigns for employee feedback, internal concept testing, and organizational research. Use your mailing list to target specific teams or departments. You can also disable incentives for internal campaigns if your organization prefers.
What video formats are supported?
Vurvey accepts most common video formats including MP4, MOV, WebM, and AVI. For best results, recommend respondents record in landscape orientation. Videos are automatically compressed and optimized for playback.
How do I ensure respondent privacy?
Vurvey takes privacy seriously. Respondent data is encrypted at rest and in transit. You can configure anonymized responses that remove identifying information. For sensitive research, enable additional privacy controls in your workspace settings. Always inform respondents about how their data will be used.
Can I run the same campaign multiple times?
Yes. Use the Copy (duplicate) feature on the campaign card to create an identical copy. This is perfect for tracking studies where you want to run the same questions at different intervals to measure changes over time.
What happens if a respondent has technical issues?
If a respondent reports technical difficulties:
- Verify the campaign is Open and the link is correct
- Recommend they try a different browser (Chrome works best)
- For video recording issues, suggest clearing browser permissions and trying again
- If problems persist, they can use Video Upload to record with their native camera app and upload the file